Feeds:
Posts
Comments

Archive for the ‘dinner’ Category

20130523-180839.jpg

The Finished Product

A Quick History of the Vidalia Onion
Growing up in Georgia, Vidalia onions were apart of the spring/summer.  Did you know that they are Georgia’s state vegetable!!??  They are ONLY grown in Vidalia, Georgia, which we southerners call them Vi-day-l-yuhs, NOT Vi-dahl-yahs.   They really came as an accident.  During the depression, farmers in GA were trying to find the cash crop.  When their onions were harvested, they realized they were sweet!  With the birth of the sweet Vidalia onion, the newly built farmers market in Southern GA, and the owner of Piggly Wiggly grocery store helping to market them, they soon became a success around the country.   Though sweet onions are grown in other places, the distinct flavor comes from the sandy soils and milder climate.

Storage Tip:
They don’t tend to last on the shelf very long, but in order to preserve their life, stick them in the leg of a panty hose and put a knot at the end of each onion.  Hang them from the ceiling and when ready to use one, just cut above the knot.

So, this delicious dish came to me by way of my mom.  I can’t say that she really spent a whole lot of time in the kitchen, but this is one of the best dishes she ever made.  I have doctored it a bit and adapted it to the GF life-style, but the truth be told, I can’t really say I notice a huge difference.  When I asked her where it came from, thinking she’d tell me who passed it down to her, she told me she invented it.  My respect for her grew right then and there!!  Thanks mom for one of my favorite dishes!!

This makes a great side dish when invited to a party or hosting your own.  Even if you don’t like onions, you’ll love this dish!!


Vidalia Onion Sweet Surprise

Serving Size: 6 full onions, feeds 6-8 people

Prep Time: 20 minutes

Cook Time: 45 minutes

Ingredients:

20130523-180903.jpg

Ingredients

  • 6 Vidalia Onions, peeled and half cored; (sweet onions will work, too)
  • 1 cup of brown sugar + 1/4 cup of brown sugar
  • (you can substitute the 1/4 cup of sugar for 1/4 cup black strap molasses)
  • 1 stick of butter (1/2 cup)
  • 1/4 cup of corn flake crumbs or cracker/cereal substitute
    (I usually buy them from Whole Foods or Amazon in bulk – 6 containers.  I freeze what I’m not using.)
  • 1/2 – 1 cup of parmesean cheese
  • 1 tsp of salt (I prefer himalayan salt)
  • 1 tsp of pepper
  • pinch of dry mustard

Supplies:

  • large pyrex dish
  • coring knife
  • sauce pan
  • stirring spoon
  • measuring cups and spoons

Directions:

  1. Preheat oven to 425*F.
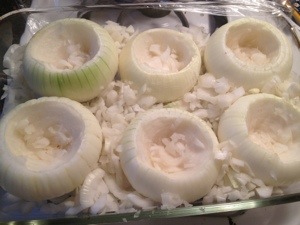
  2. Core onions from the top so that the root part is at the bottom.  Create a well, so make sure to leave the bottom in tact.  You’re going to put a filling in it later.
  3. Place onions in a pyrex dish.
  4. Chop the onions pieces you cored out and place them in the dish around the onions.

    20130523-212858.jpg

    Hollowed Out Onions

  5. Fill the dish about an 1/8″ full of water so that the onions won’t burn in the oven.
  6. Meanwhile, on the stove top over low heat (or microwave), melt the butter and brown sugar together, stirring constantly (about 1-2 minutes).  You can always add more of anything.  If you want the sauce thinner, add more butter.  If you want it sweeter, add more brown sugar.  I happen to have run out of brown sugar tonight, so I poured in some black strap molasses, too, and it worked perfectly.  Then we also got the iron benefits of the molasses.

    20130523-180858.jpg

    Melting Butter & Brown Sugar

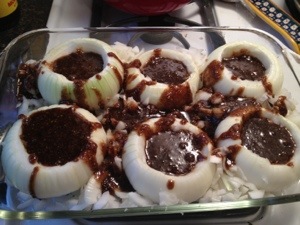
  7. Remove from saucepan from heat and add remaining ingredients.  Stir to evenly combine.

    20130523-180852.jpg

    Stirring all Ingredients together until Combined

  8. Pour the sauce into the wells of each onion, and then pour the rest of the sauce over the chopped onion bits surrounding the onions.

    20130523-180845.jpg

    Sauce Application

  9. Bake for about 45 minutes until the sauce is bubbling and the onions are softened.
20130523-200330.jpg

The Finished Onion Product

Read Full Post »

20130418-200809.jpg

Delicious Pesto Sauce

My family LOVES pesto sauce.  My daughter prefers to eat it over marinara.  So, I try to keep some in the fridge, but the truth be told is that I never make enough.  The best thing to do is make tons of sauce, and freeze it in ice cube trays to be used later.

Our favorite uses of pesto:

  1. On pasta
  2. On Pizza
  3. Baked on Chicken

What are your favorite ways to use pesto?

Gluten-Free Pesto Pasta

Disclaimer: I did not invent this recipe, but have no idea where I got it from.

Serving Size: 4-6 people, about 1 pint

20130418-200801.jpg

Bag of Hydroponic Basil

Ingredients for Pesto:

  • 2 cups basil leaves (I used 2 bags of hydroponic basil)
  • 2 cloves garlic, peeled
  • 1/4 cup pine nuts (I like Trader Joe’s because there’s no cross-contamination)
  • 2/3 cup Extra Virgin Olive Oil (any olive oil will do)
  • 1/2 cup Parmesan cheese (I also use Trader Joe’s grated parm and stash it in the freezer)
  • Salt/pepper

Ingredients for Pasta:

  • 1 bag of gluten-free pasta – favorite brand is Tinkyada
  • 2 heads of broccoli
  • 1 TBSP of olive oil
  • *optional – extra parmesan as topping
  • *optional – handful of pine nuts as topping

Directions:

  1. Get pot of boiling water going for pasta.
  2. Meanwhile, put all ingredients, except the oil in the food processor, and process until blended.
  3. Slowly pour in the oil.
  4. Add salt and pepper to taste.

    20130418-200814.jpg

    Makes about 1 Pint of Pesto Sauce

  5. When pasta water is boiling, put the pasta in the water and follow directions of pasta bag.
  6. 2 minutes before the pasta is done cooking, throw in some chopped broccoli.

    20130418-202407.jpg

    Broccoli Added to Pasta

  7. When pasta is done cooking and broccoli is done to liking, pour into colander and rinse with cold water.
  8. Coat pasta with the 1 TBSP of olive oil to keep it from sticking together if not serving right away, otherwise, follow step #9.
  9. Toss pasta with pesto sauce.

    20130418-202401.jpg

    Pasta Coated with Pesto

  10. Bon Appetite!

Read Full Post »

I was fortunately to be invited to my dear friends’ house for Passover dinner while I was in Atlanta.  Rebecca is a fantastic cook, and they always serve the most wonderful food.   The best part about it was that it was all gluten-free (and soy-free), because neither of which you can have on Passover!!  And on top of that, two of their kids have Celiac Disease, which just means I can eat with them and always feel good!

This recipe has been adapted from both my mom’s version (which usually uses Ramen Noodles) and Rebecca’s version with candied nuts.  I had leftover chicken to through in, which just made it even better!  This is a great, fast dish to take to potlucks and parties.

On a side note, my husband who had refused to eat it upon hearing its name, decided it was delicious and really enjoyed the candied nut addition.

Oriental Cabbage Salad with Candied Nuts Recipe

20130412-143356.jpg

Oriental Cabbage Salad

Serving Size: If used as a side dish about 12 people

Storage Note:  I store the chicken, nuts, and dressing separate from the other salad ingredients to keep them from getting soggy and gross.

Ingredients for Cabbage Salad:

(feel free to leave off or add any ingredients as you see fit)

  • 1 cabbage, shredded or cut super thin
  • 4-5 carrots, grated
  • a bunch of scallions, chopped (but since I didn’t have any, I used about 1/2 an onion)
  • *Optional: pre-cooked chicken, chopped into small pieces (I used grilled chicken from the previous night)
  • candied nuts (click here for recipe) – (*If vegan, just toast nuts instead*)

Ingredients for Oriental Dressing:

  • 3/4 cup of  safflower oil (or some other non-tasting oil)
  • 1/4 cup of sesame oil
  • 1/3 cup cider vinegar
  • 1/4 cup of honey (you can substitute this for sugar as well)
  • 1/4 cup of sugar

Directions for Cabbage Salad:

  1. Mix together cabbage, onions, carrots in a large bowl.
  2. When ready to serve, add chicken and candied nuts.
  3. Pour dressing on last, so the salad doesn’t get soggy.

Directions for Salad Dressing:

  1. In a large measuring cup, pour in the vinegar and sugar/honey and whisk it till well combined.
  2. Add in the cider vinegar a little at a time while continuing to whisk.
20130412-143350.jpg

Oriental Salad Ready to Eat!

Read Full Post »

Our Kid-Friendly, GF/DF Seder

photo(1)

Having Fun with Friends and Family

Passover is one of my most favorite holidays.  It’s the celebration of the Jewish People leaving Egypt as slaves.  We get together to sing songs and eat and celebrate our freedom.  With several little people at the seder (the passover meal), we revised the way we did things.  We brought in Sammy the Spider’s Passover Haggadah, (the book we use for the order of the seder and the songs).  It was a big hit!!

The Haggadah with Sammy the Spider

photo 1

Sammy the Spider Haggadah

We will confess that though it was the perfect dinner, the haggadah was missing the 4 glasses of wine and the majority of the plagues, that we will add in next time.

The Seder Plate

photo 2

The Seder plate has food on that is symbolic of the Jews leaving Egypt:

  • matzah – is the cracker like bread that the Jews made before leaving Egypt, but didn’t have time to let it rise.  It baked on their backs.
  • the “roasted” egg (though this one was not) – symbolized the renewal and cycle of life generations later
  • an orange – symbolizing solidarity with the LGBT community
  • bitter herbs (usually horseradish) reminds us of the bitter times when we were slaves in Egypt
  • the shank bone (a bone from a lamb, but you can see the dog bone for this one) – represents the lamb that was the special  sacrifice the night before the exodus from Egypt
  • Charoset – the apple, nuts, and wine mixture that represents the mortar of the bricks the Jewish had to make as slaves in Egypt
  • Parsley or Celery dipped in salt water – to symbolize the tears shed by the Jews in slavery

The Matzah

photo 3

Yehudah GF Matzah

The best GF Matzah out there is Yehudah matzah.  It was marked on our table, because it technically can’t be used for sacrimental purposes since it does not contain any wheat.  However, it tastes far better than the gluten matzah (like potato chips) and doesn’t make you constipated!!

Lighting the Candles

photo 4

Lighting the Candles

It is customary to light the candles to welcome the holiday into the home.  Here my daughter and nephew were helping my mom.

Breaking the Middle (GF) Matzah (Afikomen)

photo 5

Breaking the Middle Matzah with Bop

During the Seder, from the stack of 3 matzah on the table, you take the middle one and break it in half.  The larger “half”, called the Afikomen, symbolizes the lamb sacrifice (which is sacrificed no more since the Biblical Jewish Temple was destroyed.  The Afikomen is then wrapped up in a napkin and hidden for the kids to find after the Seder is over.  It’s like their incentive to sit through the whole Seder.  Once it is found, money is usually handed out.  When my mom told everyone they would get a present, my daughter was super excited.  My mom handed out $2 bills and my daughter says, “This is not a present!!”

Appetizer: The Matzah Ball Soup

photo 1

Using Stickers while Awaiting the Soup

photo 2

Yum! The Delicious GF Matzah Ball Soup!

Matzah Ball Soup is on of the traditional foods served at Passover.  A thin chicken stock is used and the balls are made out of matzah meal (ground matzah).  These GF matzah balls were served to all the guests and no one knew the difference.  They were light and fluffy.  They were the best GF matzah balls I’ve had yet.  (See recipe for Gluten-Free Matzah Balls below).

The Meal

photo 3

Utensil-less Eating of the Delicious Passover Meals

photo 1

My Sister and Niece Eating a Yummy GF Meal

The whole meal was gluten-free (and dairy-free), and why not?!!  We had brisket, turkey, carrot souffle, green beans with almonds, and wild rice.  Feel free to ask for any of the recipes.

The Modern Seder

photo 4

My Gma Video-Chatting with her Newest Great-Grand Child

Write and tell me about your Seder traditions and experiences and ways of making it gluten-free and/or kid-friendly!

Mother’s Matzo Balls

adapted from Keneseth Israel Sisterhood Cookbook out of Louisville, Kentucky 1971

photo 2

GF Matzah Ball Soup

Serving Size: about 30, 1.5″ in diameter balls

Ingredients:

photo 3

  • 3 tbsp of chicken fat (skimmed off of the top of homemade chicken stock)
  • 3 eggs, slightly beaten
  • 3/4 cup matzah meal
  • 1 tsp salt
  • 3 tbsp of soup stock
  • pot of stock (we use chicken that we made)

Directions:

  1. Mix fat, eggs, seasoning and liquid.
  2. Add matzah meal and mix lightly until blended.
  3. Cover the mixing bowl and place in the refrigerator for at least 20 minutes.
  4. Bring stock to a brisk boil.
  5. Make matzah balls using about a tsp to scoop them out and drop them into briskly boiling stock.
  6. Cover pot and simmer for 40 minutes.
  7. Enjoy!

Read Full Post »

20130322-131417.jpg

A Slice of the Swiss Chard Artichoke Pie

I was trying to think of something clever to do with my swiss chard, because I’m trying to eat up everything in my refrigerator before heading to visit family for Passover.  So, I came up with this Gluten-Free Swiss Chard and Artichoke Pie using the Chebe dough.

Swiss Chard and Artichoke Pie

adapted from Martha Stewart’s Swiss Chard Pie

Serving Size: 6-8 people, assuming no one is having seconds

Ingredients for the Pie Filling:

  • 2 tablespoons extra-virgin olive oil
  • 1 onion, diced (any kind will do)
  • 4 garlic cloves, minced
  • 2 1/2 pounds Swiss chard, stems cut into small dice and leaves torn (I just used one bunch)
  • 1 can of artichoke hearts, drained and chopped
  • dash of red-pepper flakes (or more to taste.  I was afraid my daughter wouldn’t eat it if it was spicier.)
  • Coarse salt and ground pepper
  • 1/2 cup grated hard cheese (I used a blend of parmeasan and romano)
  • 1 tablespoon fresh lemon juice (I just squeezed in half a lemon and since I have a bunch of Meyer lemons, I used one of those.)
  • 1 large separated into yolk and white

Ingredients for Pie Crust using Chebe All-Purpose Bread Mix:

  • 1 box of chebe all-purpose bread mix
  • 2 eggs, scrambled
  • 2 TBSP of olive oil
  • 3 TBSP water (and a little extra if dry)
  • NOTE: I DO NOT use cheese in the crust.

Supplies:

  • Rolling pin
  • pot for boiling
  • pan for sauteing
  • wooden spoon for stirring
  • parchment paper

Directions for Filling:

  1. Preheat over to 375*F.
  2. Over high heat, bring chard leaves and stems to a boil in a pot of water.  When it reaches a boil, simmer for just a few minutes until they’re wilted.
  3. While the chard is boiling, in another pan, saute onions and garlic in olive oil over medium-high heat until onions soften.  About 2 minutes or so.  I like to cook mine a little longer so some caramelize.
  4. Remove chard from water and squeeze out as much liquid as possible.  Add to saute pan along with the artichokes and chili pepper flakes.
  5. Saute until everything is warmed through, about 3 minutes or so.
  6. Remove from heat and add to pan cheese, egg yolk, lemon juice, and salt and pepper.  (You could do this separately in another bowl, but I thought, why dirty another dish!!)

    20130322-131331.jpg

    Chard Mixture with all Ingredients Mixed In

  7. Grease pie plate well.  I just rubbed olive oil on the bottom of it.
  8. With your pie dough, split it in half and roll out 1/2 between 2 pieces of parchment paper.  (See instructions below).  Remove the top sheet of parchment paper and place pie plate upside down over the crust.  Together, flip the pie plate and the crust over.  Then slowly remove the parchment paper.

    photo 1

    Rolled out Dough

  9. Place the chard mixture on top of the pie crust.
  10. Then, roll out the other 1/2 of the pie crust.  Remove the top parchment sheet, and carefully turn it over and place it on top of the pie.
  11. Pinch the top and bottom crust together as best as you can.
  12. Use the egg white mixed with 1 tsp of water.  Brush on top of the pie.  (I forgot to do this, but it’s why mine is not shiny).
  13. Cut at least 4 vent holes in the top of the pie.

    photo 2

    Sides Pinched, Holes Made

  14. Bake for about 30 minutes.  (Confession. . . I wasn’t really paying attention to how long I cooked it.  I just kept checking on it.  So, if you make this, let me know how long you cooked it for.  I just needed the crust to be cooked through.)

    20130322-131401.jpg

    Cooked Swiss Chard – Artichoke Pie

Directions for Pie Crust:

  1. Mix all wet items in bowl – eggs, oil, and water.  I use a fork for the whole crust until I “knead” my hands 🙂
  2. Add the dry mixture, and continue to use the fork, pushing it down and scraping it across the liquid until it gets clumpy.
  3. At this clumpy point, I stick my hands in and keep kneading it until it is super smooth.  If done right, it should not be sticky at all.  It only gets sticky when too much water is added, so err on the side of caution.  If after about 2-3 minutes of kneading, it is not coming together, add just a tiny bit more water, but do no use as much as a tablespoon.
  4. Split the dough in half, and put one half between 2 pieces of parchment paper.  Roll out until it is a bit wider in diameter than your pie plate, because you want it to come up the sides.
  5. Slowly removed the top parchment paper and put the greased pie plate upside down, over it.  Together, flip them over.
  6. Do the same process in #4 for your 2nd half of the dough.
20130322-131411.jpg

Inside of DELICIOUS Chard and Artichoke Pie

It was truly amazing, and my daughter ate the whole thing!!!  You can also try to make this as little appetizers, by making it in individual muffin tins.

Read Full Post »

20130225-211224.jpg

Spinach Muffins

I was inspired by a friend, Elana, several years ago to find more creative ways to make vegetables for my little eater who was probably about 1.5 then. The name makes it sound a good deal more playful and interesting to a toddler. This recipe has inspired me to create others similar and for no other reason than it is soo simple and literally takes less than 5 minutes to mix all the ingredients.  I have used it as an appetizer.  It tastes just like a crustless Spanikopita.

Gluten-Free Spinach Muffins

Serving Size: about 24 mini-muffins

Ingredients:

20130225-211212.jpg

Spinach Muffin Ingredients

– 1 egg
– 1 box of 10 oz frozen spinach (or more) or any other veggie.  (If using fresh veggies, make sure you steam them for about 3 minutes first).
– 1/2 16 oz. container of cottage cheese (can substitute ricotta)
– 1 cup of shredded cheese (I use cheddar, but any kind is fine)
– 1/2 tsp salt or to taste
– 1/2 tsp pepper or to taste

Supplies:

– mini-muffin tin (you can use a bigger one, but I don’t know how many it will make)
– cooking spray
– mixing spoon
– bowl
– spatula

Directions:

1. Preheat oven to 350.
2. Grease muffin pan REALLY well.  Because there is cheese in this, it sticks.  I’ve tried using muffin liners, but the cheese sticks to those, too, and makes them difficult to eat.
3. Mix all the above ingredients together.  (I often don’t measure and just eyeball everything).
4. Spoon batter into muffin tins.
5. Cook for about 20-25 minutes, until the edges start to lightly brown.

20130225-211218.jpg

Fresh Out-of-the-Oven Spinach Muffins

Read Full Post »

Diane Ravitch's blog

A site to discuss education and democracy

APS Today

The official blog of Atlanta Public Schools

Granted, and...

thoughts on education by Grant Wiggins

Celiac Central: Bits and Bites

National Foundation for Celiac Awareness staff members dish and digest

Maia Toll

Gluten-Free Food and Fun

WRiteLiveLily

A Catalog of Writing-in-Progress

Invision Events: Wedding Planner | Day Of Wedding Coordinator | Atlanta | Birmingham | Montgomery | Auburn | Dallas | Ft. Worth

Wedding Planner and Day Of Wedding Coordinator for Georgia and Alabama | Atlanta | Birmingham | Montgomery | Auburn | Mobile | Dallas | Ft. Worth

StressLess Views and other TidBits

Gluten-Free Food and Fun

Happy Go Lucky & Gluten Free

Gluten-Free Food and Fun

Gluten Freedoms' Blog

Gluten-Free Food and Fun