Feeds:
Posts
Comments

Archive for the ‘vegetables’ Category

20130312-104725.jpg

Spring Rolls with homemade duck sauce and sweet and sour sauce

I was having take out dinner with a few friends, where I of course brought my own food.  They had some kind of Asian cuisine, which made me crave spring rolls.  So, I figured out how to make delicious spring rolls.

Gluten-Free Spring Rolls

Serving Size: 12 Spring Rolls

Ingredients for Spring Rolls:

– 1 package of rice wrappers
any vegetables on hands:
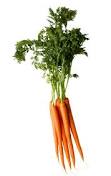
– 1 carrot, julienned
– 1 zucchini, julienned
– 1 squash, julienned
– 1 package of  mushrooms, thinly sliced
– 1/2 cabbage, shredded (I used purple)
– 1/2 – 1 onion, thinly sliced
– oil for frying (peanut, canola, safflower, soy)

Supplies for Spring Rolls:

– shallow pan (for wetting wrappers)
– saute pan
– deep pot for frying (so to avoid splatter)
– tongs

Directions:

1. Chop all of the vegetables.
2. Over medium-high heat, saute the onions first for about a minute, then add in the rest of the vegetables and cook until tender, 5-7 minutes.
3. In another shallow pan, fill about an inch full of room temperature water.  One at a time, place the rice wrapper in the water (following directions on package) for about 30 seconds or so, until it softens.
4. After each wrapper is soft, place it on a clean surface (like a cutting board), and fill the center with about 1/4 cup of vegetable mixture.  Be careful, because the wrapper are a bit sticky and can tear.  However, it’s pretty easy to roll over the tear because the wrapper will stick to itself.

20130312-104653.jpg

Roller Rice Wrappers before Frying

5. Fold each wrapper by folding over one long side first, then folding in both the shorter sides, then rolling it to wrap the rest of the longer side.
6. With a couple of wrappers left to fill, add about 1/2 in of oil your tall frying pot and heat over medium-high to high heat.  You should see it begins to smoke, which tells you it’s ready.  I chose not to put more oil in for a super deep fry.  I never want to end up with too much!
7. Depending on how wide your pot is, ONLY put 1-2 rolls in at a time.  They will stick to each other and fall apart.  I started with 1 at a time.  I fried it for about 2 minutes, rolling it about every 30 seconds so the other sides could brown.

20130312-104735.jpg

Spring Roll Frying

8. Remove from frying pot and place on a baking sheet covered in brown paper bags for oil absorption and cooling.

20130312-104747.jpg

Duck Sauce on Left and Sweet and Sour on Right

9. When all are cooked, serve with dipping sauces.  (Recipes below).

20130312-104712.jpg

Spring Roll with Dipping Sauces

Recipes for Sauces

These sauces are taken verbatim from cooks.com and will also provide the links below.

20130312-104636.jpg

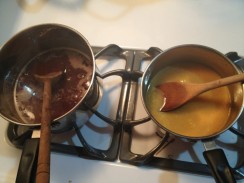
Duck Sauce on Left, Sweet and Sour on Right

Ingredients for Duck Sauce:

Serving Size: about 1.5 pints (it filled up 1 1/2 small jam jars)

acv

Bragg Cider Vinegar

Duck Sauce

1 c. plum preserves (I had made my own from the summer!!)
1/2 c. apricot preserves
2 tbsp. honey (I like to use local honey)
2/3 c. cider vinegar (I used braggs apple cider vinegar)
1 clove garlic, minced

Mix ingredients in a saucepan; bring to a boil over medium heat. Cook 5 minutes, stirring constantly. Store in sterilized jar in refrigerated.

Ingredients for Sweet and Sour Sauce:

Serving Size: 1/2 pint (it filled 1/2 a small jam jar)

Sweet and Sour Sauce

3 tbsp. vinegar (I used white vinegar)
1/2 c. orange juice
1/2 c. brown sugar
1 tbsp. cornstarch mixed in 1 tbsp. water

Combine all ingredients in small saucepan. Bring to a boil while stirring constantly. Turn down and simmer 5 minutes or until thick. Add a dash of red food coloring for color (optional). Cool and serve. May want to double the recipe.
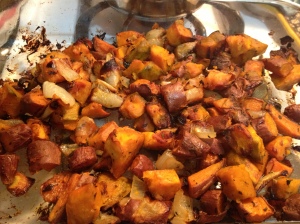
Read Full Post »

DSC00997

Gluten-Free Renegade Latkes

Photograph taken by Brittany Sanford

At the last minute, I decided to throw a very small gathering Hannukah Party.  And of course, what’s a Hannukah party without Latkes.  I usually make sweet potato latkes, but this year I decided to get a bit more rebellious and cook with my most favorite ingredient . . . MOLASSES!  If you want to read more about the health benefits of molasses, check out the Frankenstorm Chocolate Chip Molasses Brittle Cookies Recipe.

My specialty is sweet potato latkes.  When I realized I only had two sweet potatoes in my kitchen, I knew creativity was to be born!  I decided to mix the sweet potatoes with butternut squash, but that would cut the sweetness.  I then decided to add apple to give it a sweet burst, and upon looking in the fridge, I had this burning desire to use my parsnip.  Well, then I concluded I needed it to be a bit sweeter, which gave me an excuse to use my favorite ingredient.  That’s right!  You guessed it . . . BLACKSTRAP MOLASSES!

Personally, I thought the latkes were sweet enough without the molasses, but my guests thought the molasses really hit the spot.

Gluten-Free Renegade Latkes

Serving Size: about 22 2″ in diameter latkes

Ingredients:

2 cups of grated sweet potato, skins scrubbed
2 cups of grated butternut squash, peeled and seeded
1/2 cup of grated apple, skins scrubbed and core removed
1/2 cup of grated parsnip, skins scrubbed
6 scallions chopped
1/2 onion chopped
2 eggs, slightly beaten
1 tbsp of blackstrap molasses
1/2 cup of gluten-free flour* (see #6 below for more details)
1 tsp salt
1/2 tsp pepper
Frying Oil – Coconut, Canola, etc.

Directions:

1. Preheat oven to 200*F

2. Grate the potato, squash, apple, and parsnip and put in separate containers.

20121209-221852.jpg
Grated Sweet Potato (front) and Butternut Squash (rear)
20121209-221901.jpg

Grated Apple (left) and Grated Parsnip (right)

2. Grate the potato, squash, apple, and parsnip.  The apple will need to be squeezed out.  I used a ricer to squeeze out the juices, which I caught in another cup and drank!  Then mix all the food you grated together in a large bowl.  If you decided to create your own base ingredient mix, then make sure that together it weighs about 1 lb or 16 ounces.

20121209-205431.jpg

3. Chop onions and scallions and toss them into the mix.

4. Add salt and pepper and toss.

5. Add slightly beaten egg and molasses and toss to mix evenly.

6. Add 1/2 cup of your gluten-free flour blend or 1/4 cup of a gluten-free 1/4 cup of a starch.  I use my hands to mix this in really well and make sure the consistency is just right.  If not, I add about a teaspoon at a time of more flour.  For one batch I used a gf flour blend, and another batch I mixed 1/4 cup of brown rice flour with 1/4 cup of tapioca starch.  As for flours, just pick one with a milder flavor and any starch will do.  Some people like to use potato starch, since you’re cooking with potato.  Other recipes call for only starch, but I really prefer the starch/flour combo or gf flour blend.

Latke Mix

7. Add oil to your pan so that it comes up about 1/4 of an inch high.  I set the burner to right below the highest heat setting and wait about 5 minutes to make sure my oil is good and hot.

8.  While the oil is heating up, I put parchment paper on a baking sheet, and set that in the preheated oven.

9. Then, I use my hands to make about a 2″ in diameter flat pancake.  I lay that on a spatula, and gently put it in the oil.  I put about 4-5 latkes in the oil so as not to decrease the heat too much.  You want the oil to bubble when you put it in.  I cook it for about 1-2 minutes per side.  When the edges start to brown, then you know to flip it.

20121209-205442.jpg

Frying Latkes

10. When the latkes are done, I transfer them onto the baking sheet in the oven.

11.  When all the latkes are completed, I turned my broiler onto low and just finished them off in there so that they would be super crispy.

12.  You can top with applesauce, sour cream, or some other fun dip!

The latkes turned about to be  AMAZING!!!  I was so glad I made 3 batches for 7 1/2 people.  I would not have had enough!

Read Full Post »

Roasted Root Vegetables

Roasted Root Vegetables

Food Energetics:

I like to eat what’s in season, believing that I derive lots of needed nutrients from the seasonal plants.  Remembering that winter is a time of hibernation, and the sun, too is hibernating we often times  feel seasonal depression from the shorter days or just a waning of energy.  Many root vegetables live in the ground, and though they can have stems and flowers, most of these stems and flowers have died off and also gone into hibernation, returning their energy back into the ground.  Therefore the plant’s energy has shifted from creating flowers into its root by storing nutrients and minerals.  So, if we eat the roots of these plants during the winter, we are eating them at their fullest energy potential to help us energize through the darkness days.  Check out this link if you want to read more about the health benefits of root vegetables.

_______________

This dish is one of the most simple dishes that I make, and other than chopping, there’s little prep work involved.  I usually use whatever I have on hand in my fridge especially when I’m trying to clean my fridge out.  Since I tend to use whatever I have on hand, the technical term for the vegetables is root crops, because as you’ll soon read, they are not all roots.

I am obsessed with researching and learning, which brought me to learn exactly what types of food are really going into this dish.  I will go into more detail below, but if you do not have the same passion that I am possessed by, no worries!  Just skip down to ingredients below.

Definitions:

A root crop is any edible, underground plant structure, thereby defining

The rest of the foods are all under the category geophytes, requiring a dormant period, and are a storage unit for the plant:

Root (carrot)

Root (carrot)

Roots – are the organs of the plant that absorbs water and nutrients, anchors the plant to the ground, and stores food and nutrients for the plant.

Bulb (onion)

Bulb (onion)

Bulbs – consists of layers that grow underground and store food for the developing plant.

Corm (Gladiola)

Corm (Gladiola)

Corms – resemble bulbs, but have a solid mass of tissue instead of layers that grow vertically underground.

Rhizome (ginger)

Rhizome (ginger)

Rhizomes – a shallow stem that grow horizontally underground. Off of rhizomes grow roots, and part of the plant can appear above ground.

Tuber (potato)

Tuber (potato)

Tubers – have leathery skin and eyes.  They are underground stems that grow thick instead of long.

Catch-All Roasted Root Vegetables Recipe

Ingredient (here’s a sample of what you throw in there, but keep reading for step-by-step instructions):

Tubers: sweet potatos, white potatos, beets, celeriac, rutabega, etc.
Winter Squash: hubbard, butternut, acorn, etc.
Roots: Parsnip, carrots, horseradish
Bulbs: onions, garlic, fennel
Corms: Celeriac
Rhizome: ginger
Herbs: thyme, rosemary, chives, parsley
Olive Oil
Salt
Pepper

Glass Baking Dish

If you DON’T want to be creative, continue reading for step-by-step guidance below: 

If you DO want to be creative, mix and match anything from the list above and skip to the directions below:

Ingredients:

1 winter squash – peeled and cubed into 1 inch pieces
1 onion – peeled and roughly chopped
4 cloves of garlic – peeled and roughly chopped
1 celeriac – peeled and cubed into 1 inch pieces
1 fennel – rinsed/dried, top part removed and bulb roughly quartered
2 sweet potatoes (or white) – scrubbed/dried and cubed into 1 inch pieces
1-2 parsnips depending on size – scrubbed/dried and cubed into 1 inch pieces
1-2 carrots depending on size – scrubbed/dried and cubed into 1 inch pieces
about 2 tbsp of fresh thyme (dried will do, but start with half the amount)
about 2 tbsp of rosemary (dried will do, but start with half the amount)
about 2 tsp of salt
about 2 tsp of pepper
extra virgin olive oil (about 1/4 cup)

You’ll want to have a glass baking dish about 9×12 on hand.

Serving size: about 6-8 portions

Directions:

1. Preheat oven to 400F

2. Throw all ingredients above (minus the olive oil) and toss in a glass baking dish.  Drizzle olive oil over vegetables and toss again.

3. Put vegetables in the oven, tossing them every 20 minutes for about an hour.  I like mine a bit crispier, so if you like them a little al dente, then check them after about 50 minutes or so.

4. Serve hot!  It makes for great leftovers, too.

Read Full Post »

roasted asparagus

Need a quick side dish for dinner?  Roasting asparagus is super easy and is like eating asparagus fries.  We like ours to get pretty crisp.

Ingredients:

olive oilkosher salt
1-2 bunches of asparagus
metal pan
optional: parchment paper

Preparation:

  1. Preheat oven to 400*F
  2. Rinse and dry your asparagus
  3. Line your metal pan with parchment paper for easy clean up, but you can skip this step if need be. Snap ends off of bottom of asparagus.  They should snap easily at their natural breaking point.  My 3 year old daughter loves to do this party with me.
  4. Lay out the snapped asparagus on the pan.
  5. Drizzle olive oil over them (1-2 TBSP) and then sprinkle with kosher salt.  About 1 tsp of salt per bunch of asparagus, but you can eye-ball this.  You don’t want it to be coated with salt, but you do need more than a pinch.
  6. Toss the asparagus on the pan with the salt and olive oil.  Make sure they’re coated, but you don’t want oil dripping off.
  7. Stick in the oven at 400*F and toss every 15-20 minutes until they are done to your liking.  If you want them crispy, I’d recommend 45 minutes or so.Voila!  Roasted Asparagus!

Read Full Post »

Diane Ravitch's blog

A site to discuss education and democracy

APS Today

The official blog of Atlanta Public Schools

Granted, and...

thoughts on education by Grant Wiggins

Celiac Central: Bits and Bites

National Foundation for Celiac Awareness staff members dish and digest

Maia Toll

Gluten-Free Food and Fun

WRiteLiveLily

A Catalog of Writing-in-Progress

Invision Events: Wedding Planner | Day Of Wedding Coordinator | Atlanta | Birmingham | Montgomery | Auburn | Dallas | Ft. Worth

Wedding Planner and Day Of Wedding Coordinator for Georgia and Alabama | Atlanta | Birmingham | Montgomery | Auburn | Mobile | Dallas | Ft. Worth

StressLess Views and other TidBits

Gluten-Free Food and Fun

Happy Go Lucky & Gluten Free

Gluten-Free Food and Fun

Gluten Freedoms' Blog

Gluten-Free Food and Fun