Feeds:
Posts
Comments

Archive for the ‘Kid-Friendly’ Category

https://i0.wp.com/glutenfreehotproducts.com/wp-content/uploads/2014/02/grammy-crisps.jpg

Cheezy Crisps & Grammy Crisps

Are you always on the hunt for the perfect gluten-free cracker?  Finding them too bland, tasting like cardboard, or flimsy?  Well, I definitely am!  Every time I go to the grocery store, I’m always scanning the cracker aisle, looking for a suitable gluten-free cracker to replace all those buttery, flaky, gluten ones, and yet, I’ve been hard pressed to find a replacement . . . until today!

So, you can imagine my surprise when I ventured to try Crunchmaster’s certified gluten-free Cheezy Crisps and Grammy Crisps and was wowed to the max!

To read more, click here . . .

This article can also be found on the National Foundation for Celiac Awareness’s Gluten-Free Hot Products Page

A special thanks goes out to Stephanie Gill, Pam Vassilikos, and of course my daughter who were instrumental in the reviewing of the crackers!

Read Full Post »

20130522-202602.jpg

The Finished Ball

One day, not long after I had gone gluten-free, my grandma, Honey, called me, to tell me of a recipe she made that just so happens to also be gluten-free.  I couldn’t have been more thrilled to think of a dessert with peanut butter and chocolate all in one that had NO GLUTEN!!  And takes about 10 minutes to make and 10 to bake!

After a lot of playing with the basic recipe my Honey had given me, I perfected a relatively low sugar dessert.  The secret is the chocolate chips stashed in the middle of the ball.

The peanut butter we use just has roasted peanuts and nothing else added.  I have often found that certain peanut butters make me sick and then I wonder if they’ve been crossed processed.  In Philadelphia you can get Crazy Richards, which was actually made by a local Philadelphian who ground his own peanuts.  Roomer has it from a parent I know that Richard use to run a small in-home daycare in the city, all the while, making his own peanut butter.

If we’re looking for an organic one, we have found Santa Cruz makes an excellent one.

Gluten-Free Inside-Out Peanut Butter Balls

Serving Size: about 20 1″ balls

Prep Time: 10 minutes

Cook Time: 10-12 minutes

20130522-202617.jpgIngredients:

  • 1 cup of peanut butter – we use peanut butter that just has roasted peanuts and nothing else added
  • 1 egg
  • 1/2 cup of sugar
  • about 1/2 cup of chocolate chips – we use Enjoy Life

Supplies:

  • large mixing bowl
  • spatula
  • cookie sheet
  • parchment paper

Directions:

  1. Preheat oven to 325*F.
  2. In a bowl, mix egg, sugar, and peanut butter all together until there is a smooth consistency.
  3. Take a pinch in your hand and roll it into a 1″ ball.

    20130522-202624.jpg

    Rolling Batter into a Ball

  4. Use your thumb to place a small whole in the middle of it.
    20130522-202648.jpg

    Small Well in Center of Ball


  5. Fill well with a handful of chocolate chips.
    20130522-202641.jpg

    Filling Well with Chocolate Chips


  6. Fold over edges of dough around chips.
    20130522-202630.jpg

    Folding Dough Edges around Chips


  7. Roll dough back into a ball.
    20130522-202654.jpg

    Dough Rolled Back into Ball with Chips inside


  8. Bake at 325*F for about 10-12 minutes.  I like mine soft, but if you prefer them crisper, then bake for longer.

    20130522-202608.jpg

    Ready to Bake

  9. Eat!

Read Full Post »

20130422-193903.jpg

Polenta topped with Ragout

I decided it was time to use a different grain tonight.  I was thinking of rice, but then I realized we should try something else.  Polenta is considered the Italian version of grits.  It’s a super fast cooking grain.  I even took a quicker fix than just using the grain and making a paste with water, I used the tube!!

This dish makes an excellent side dish or hors d’oeuvre for a dinner party.

Gluten-Free Broiled Polenta with Spinach and

Mushroom Ragout

Serving Size: about 20 polenta rounds

Ingredients:

  • 1 tbsp evol (used for polenta)
  • 1 tube of polenta precooked
  • 2 tbsp evol (used for sautéing)
  • 1 onion, diced
  • 1 clove of garlic, finely chopped
  • 1 package mushrooms, chopped
  • 2-3 cups of fresh spinach
  • generous amount of salt and pepper
  • 1/4 tsp of crushed dried rosemary
  • 4 tbsp of tomato paste
  • 1/2 tsp balsamic vinegar
  • 1/2-1 cup water
  • *optional – parmesan cheese (do not use if vegan)

Directions:

  1. Preheat oven to broil and arrange the top rack about 4″ from the top.
  2. Line a baking sheet with parchment paper.
  3. Slice the tube of polenta into 1/4″ thick rounds and lay them out on the baking sheet.
  4. Using the TBSP of olive oil, lightly brush the tops of each round and then broil them until the begin to brown about 10-15 minutes.
  5. While they are cooking, put olive oil in a pan over medium-high heat.
  6. When the oil is warm, put in the diced onions and as they begin to brown, add the garlic, sauteing for another 30 seconds or so.
  7. To the onion mixture, add the mushrooms and cook on a high heat (or medium-high) until they release their juices.
  8. Continue stirring for another few minutes until all the juices have been reabsorbed.  Then all the handfuls of spinach and toss until wilted.
  9. Add salt, pepper, and rosemary.  Cook for another 30 seconds.
  10. Then add in the tomato paste and 1/2 cup of the water.  (I actually used 4 previously frozen ice cubes of tomato paste.)  Bring it to a boil and then reduce heat to a simmer.  Continue adding water little by little if the mixture is drying out.
  11. Once water is absorbed (about 10 minutes), remove from heat and add the balsamic vinegar.

    20130422-193910.jpg

    Mushroom Spinach Ragout

  12. Top the broiled polenta with the mushroom mixture and if desired, sprinkle with parmesan cheese.
    20130422-193903.jpg

    The Simplicity of Polenta


Read Full Post »

20130418-200809.jpg

Delicious Pesto Sauce

My family LOVES pesto sauce.  My daughter prefers to eat it over marinara.  So, I try to keep some in the fridge, but the truth be told is that I never make enough.  The best thing to do is make tons of sauce, and freeze it in ice cube trays to be used later.

Our favorite uses of pesto:

  1. On pasta
  2. On Pizza
  3. Baked on Chicken

What are your favorite ways to use pesto?

Gluten-Free Pesto Pasta

Disclaimer: I did not invent this recipe, but have no idea where I got it from.

Serving Size: 4-6 people, about 1 pint

20130418-200801.jpg

Bag of Hydroponic Basil

Ingredients for Pesto:

  • 2 cups basil leaves (I used 2 bags of hydroponic basil)
  • 2 cloves garlic, peeled
  • 1/4 cup pine nuts (I like Trader Joe’s because there’s no cross-contamination)
  • 2/3 cup Extra Virgin Olive Oil (any olive oil will do)
  • 1/2 cup Parmesan cheese (I also use Trader Joe’s grated parm and stash it in the freezer)
  • Salt/pepper

Ingredients for Pasta:

  • 1 bag of gluten-free pasta – favorite brand is Tinkyada
  • 2 heads of broccoli
  • 1 TBSP of olive oil
  • *optional – extra parmesan as topping
  • *optional – handful of pine nuts as topping

Directions:

  1. Get pot of boiling water going for pasta.
  2. Meanwhile, put all ingredients, except the oil in the food processor, and process until blended.
  3. Slowly pour in the oil.
  4. Add salt and pepper to taste.

    20130418-200814.jpg

    Makes about 1 Pint of Pesto Sauce

  5. When pasta water is boiling, put the pasta in the water and follow directions of pasta bag.
  6. 2 minutes before the pasta is done cooking, throw in some chopped broccoli.

    20130418-202407.jpg

    Broccoli Added to Pasta

  7. When pasta is done cooking and broccoli is done to liking, pour into colander and rinse with cold water.
  8. Coat pasta with the 1 TBSP of olive oil to keep it from sticking together if not serving right away, otherwise, follow step #9.
  9. Toss pasta with pesto sauce.

    20130418-202401.jpg

    Pasta Coated with Pesto

  10. Bon Appetite!

Read Full Post »

20130418-190812.jpg

My Daughter with her New Glow-in-the-Dark Necklace

Glow-in-the-dark Necklace

made from the $.25 Machine

inspired by a project in the magazine Family Fun

Tools:

  • an awl or nail to piece a hole
  • 2 feet of kite string or some other type of yarn
  • at least 4 glow-in-the-dark beads, to make it glow-in-the-dark, but any kind of bead or button will do.  We used perler beads
  • $.25 machine plastic container

Directions:

  1. Take purchase a little toy for $.25 at the grocery store, but make sure it comes in one of those little plastic containers.
  2. Remove the toy.
  3. Using an awl or some other sharp tool like a nail, pierce a whole through the top of the container.
  4. Cut a piece of string about 2 feet long.  You can always trim it when you’re done.
  5. Thread a bead or a button into the middle of the string.  Knot the string several times just above the bead.
  6. Put one end of the string next to the otherand thread it through the underside of the hole.  This way, the bead will keep the string in place.

    20130418-190756.jpg

    Strung Bottom Bead

  7. Place charms or other beads along each side of the string.
  8. When you’re ready, tie the two ends of the string together in a knot.
  9. Fill the container with whatever excites your child, i.e. glow-in-the-dark beads, bugs, snack, etc.  We filled our with glow-in-the-dark beads, so that the necklace will glow-in-the-dark!
  10. Place the necklace around your child’s neck.
20130418-190821.jpg

Our Glow-in-the-Dark Necklace

Read Full Post »

I was fortunately to be invited to my dear friends’ house for Passover dinner while I was in Atlanta.  Rebecca is a fantastic cook, and they always serve the most wonderful food.   The best part about it was that it was all gluten-free (and soy-free), because neither of which you can have on Passover!!  And on top of that, two of their kids have Celiac Disease, which just means I can eat with them and always feel good!

This recipe has been adapted from both my mom’s version (which usually uses Ramen Noodles) and Rebecca’s version with candied nuts.  I had leftover chicken to through in, which just made it even better!  This is a great, fast dish to take to potlucks and parties.

On a side note, my husband who had refused to eat it upon hearing its name, decided it was delicious and really enjoyed the candied nut addition.

Oriental Cabbage Salad with Candied Nuts Recipe

20130412-143356.jpg

Oriental Cabbage Salad

Serving Size: If used as a side dish about 12 people

Storage Note:  I store the chicken, nuts, and dressing separate from the other salad ingredients to keep them from getting soggy and gross.

Ingredients for Cabbage Salad:

(feel free to leave off or add any ingredients as you see fit)

  • 1 cabbage, shredded or cut super thin
  • 4-5 carrots, grated
  • a bunch of scallions, chopped (but since I didn’t have any, I used about 1/2 an onion)
  • *Optional: pre-cooked chicken, chopped into small pieces (I used grilled chicken from the previous night)
  • candied nuts (click here for recipe) – (*If vegan, just toast nuts instead*)

Ingredients for Oriental Dressing:

  • 3/4 cup of  safflower oil (or some other non-tasting oil)
  • 1/4 cup of sesame oil
  • 1/3 cup cider vinegar
  • 1/4 cup of honey (you can substitute this for sugar as well)
  • 1/4 cup of sugar

Directions for Cabbage Salad:

  1. Mix together cabbage, onions, carrots in a large bowl.
  2. When ready to serve, add chicken and candied nuts.
  3. Pour dressing on last, so the salad doesn’t get soggy.

Directions for Salad Dressing:

  1. In a large measuring cup, pour in the vinegar and sugar/honey and whisk it till well combined.
  2. Add in the cider vinegar a little at a time while continuing to whisk.
20130412-143350.jpg

Oriental Salad Ready to Eat!

Read Full Post »

Candied Nuts

Candied Nuts

So I had eaten at my dear friends’ house over Passover and had the most amazing Oriental Cabbage Salad.  Rebecca’s secret ingredient was candied nuts.  I decided I was going to replicate her dish, but first I had to candy my nuts.  (I’ll post the oriental cabbage later).

There are two ways to candy nuts.  I did mine in the oven, but you can also just put sugar and nuts in a saute pan and saute them.  Once the sugar has melted and is well coated, you then spread the nut mixture on a baking sheet with parchment paper to cool and then break it into pieces.

However, this was the recipe I found years ago and adapted it slightly.  I have no idea where it came from, so I can’t take credit for it.  I love to mix different kinds of nuts together.  I think this recipe can double as the makings of a granola bar.  Let me know what you come up with!  I also like to just eat it as snack.  I have tried it substituting honey for sugar.  It’s just as tasty, but doesn’t quite have the crispness or the crunch I was looking for.  If you try different things, let me know what you enjoyed!

Candied Nuts Recipe

Serving Size: 1 pound

Ingredients:

  • 1 cup granulated sugar
  • 1 teaspoon salt
  • 1 teaspoon ground cinnamon
  • 1 pound nuts, crushed or halved
  • 1 large egg white, at room temperature
  • 1 tablespoon water

Directions:

  1. Preheat oven to 300*F (150*C).
  2. Lay parchment paper over a baking sheet.
  3. *If using whole nuts, crush prior to using.  Place in ziplock bag and smash with mallet.*  I of course didn’t have anything else when I was having a craving, so it’s what I did.

    20130410-142216.jpg

    Crushing Nuts

  4. In a bowl, mix together sugar, salt and cinnamon;set aside.
  5. Beat egg white and water together just until frothy, not stiff.
  6. Add nuts to egg whites and stir until well coated.

    20130410-142201.jpg

    Nuts Added to Egg White Mixture

  7. Add sugar mixture, mixing nuts until well coated.
  8. Spread evenly onto a foil-lined cookie sheet.
  9. Bake for 30 minutes. Remove from oven and separate pecans as they cool.
  10. Store in tightly closed container.
Candied Nuts

Candied Nuts

Read Full Post »

20130407-133233.jpg

Loaf Cooked to Perfection!

After being gone for 10 days, I had these very sorry black bananas staring at me. Out of guilt for not wanting to waste them, I decided it was time to make banana bread. Then, I remember all my squash I roasted and froze in the freezer. I took it out to thaw, and decided to add it. These always come out amazing every time!! No one even knows they’re GF or DF for that matter.

There are TWO secrets to gluten-free cooking:

  1. Weigh your flour!! I like to use the conversion chart to convert regular recipes to those gluten-free.
  2. Always add extra moist ingredients to breads, whether it be more bananas or (cooked) winter squash or applesauce. It gives it the moisture that’s often lacking in gluten-free baking.

Gluten-Free and Dairy-Free Banana Squash Bread

(this recipe can also make muffins as well)

adapted from Better Homes and Gardens New Cook Book 1996’s Banana Bread Recipe

Serving Size: 3 small loaf pans or 1 8x4x2-inch loaf pan

Preheat Oven to 350*F

20130407-133305.jpg

Finished Loaf

Ingredients:

  • about 1 1/4 gluten-free flour blend = 187.5 grams
  • 1 1/2 tsp baking powder
  • 1/4 tsp baking soda
  • 1/4 tsp ground cinnamon
  • 1/8 tsp salt
  • 1 egg (at room temperature)
  • 4 brown to black bananas (or about 1 cup. You can’t go wrong if you throw in more.)
  • 1 cup of roasted squash or pumpkin
  • 1/2 – 3/4 cup sugar (with super ripe bananas, I find that 1/2 cup is perfect)
  • 1/4 cup cooking oil
  • 1 tsp vanilla *optional* – use Frontier Vanilla Flavor which has no alcohol
  • 1/4 cup of chocolate chips (Enjoy Life are free of top 8 allergens) or nuts *optional*

Directions:

  1. Preheat oven to 350*F
  2. Put parchment paper in the inside of the loaf or grease the loaf. If using muffin tins, grease the muffin tins or use muffin cups.

    20130405-210641.jpg

    Combined Dry Ingredients

  3. In a medium mixing bowl combine and mix together
    all the dry ingredients:

    • GF flour blend
    • baking powder (GF)
    • baking soda
    • cinnamon
    • salt
  4. In another bowl, combine and whisk until blended:
    • egg
    • bananas
    • squash, pumpkin
    • sugar
    • cooking oil (I use safflower, because I prefer non-genetically modified oils).
    • vanilla
  5. Add moist mixture to the dry one and stir until just moistened and blended. Batter should be lumpy.
  6. Fold in optional ingredients.
  7. Divide batter equally among loaves and bake at 350*F for about 45 minutes or until a toothpick comes out clean from the center. If using different sized pans, then see note at bottom of recipe.*

    20130405-210626.jpg

    Bread Divided Between 3 Loaves

  8. Cool and eat. Store in refrigerator in airtight container.

    20130407-133244.jpg

    3 Loaves Ready to Eat!

* Pan Size Baking Time

One 9x5x3-inch loaf pan 1-1 1/4 hours
One 8x4x2-inch loaf pan 50-60 minutes
Two 7 1/2 x 3 1/2 x 2-inch loaf pan 40-45 minutes
Six 4 1/2 x 2 1/2 x 1 1/2-inch loaf pan 30-35 minutes
Twelve 2 1/2-inch muffin cups 15-20 minutes

Read Full Post »

Fridgigears

20130405-210524.jpg

Playing with Newly Acquired Fridgigear!

It was one of the first beautiful, warm, and sunny days outside, so why I ventured to the basement to find this newly acquired toy from a swap, I have NO idea!!  We still did make it outside to play.  I guess I was super excited about this toy myself.  (A good sign in my opinion).

Nevertheless, this fridgigear toy is made up of magnetic gears that double as a puzzle.  It also comes with one gear that’s a motor to operate the gears.  It was a good hour of GLUTEN-FREE entertainment!  Not only did we experiment with the gears, but the next level of fun was rearranging the puzzle pieces to form newly colored gears.

20130405-210532.jpg

Rearranging the Puzzle Pieces to form New Gears

After much searching, I have been unable to find the puzzle gears.  I have found fridgigears that glow in the dark and double as a picture frame, but no puzzle pieces.  I still highly recommend this toy as great entertainment in the kitchen while you’re cooking!

I just bought some extra sets for presents.  I found an AMAZING deal at www.scientificsonline.com for $19, and you can get another 12% off if you use the code TY2.  It’s also free shipping if you choose the slower route.

Let me know if you’ve come across other types of refrigerator fun that you love!

Read Full Post »

20130401-131235.jpg

Finished Matzah Brittle

When I was growing up, my mom always made us this delicious Matzah Brittle on Passover.  Ok, so now that I’m gluten-free and dairy-free, I begged her to make it for me again.  And my amazing mom did!!  It’s like heaven, melting in your mouth with a crunchy, sweet taste.  My only critique is that after a few days, the GF matzah doesn’t hold its crispness, but the taste is still there.  It can be used year-round on other kinds of crackers.  However, may family thinks there’s no better cracker on the market than using GF Matzah and/or GF Matzah Crackers from Yehudah.  The recipe I’m giving is a rough one since my mom never measures anything out.

The nice thing about Passover, is that anything that is certified Kosher for Passover (gebrocht), cannot contain any grain in it, which means soy is out, too.  This is a good time to stock up.

Matzah Brittle Recipe (GF/DF)

Serving Size: about 9 whole matzah, serving about 12 people
Prep/Cook Time: it takes about 10 minutes to make from start to finish

Ingredients:

20130401-131311.jpg

Only 3 Ingredients

  • Yehudah GF Matzah (about 9 squares)
  • about 1 cup of brown sugar (or more if you’d like)
  • about 1 stick of butter = 1/2 cup of butter (I used Earth’s Balance, Soy-free spread)
  • Optional Toppings: Chocolate Chips (I use Enjoy Life), Coconut Flakes, Crushed Nuts

Directions:

  1. Pre-heat oven to 350*F.
  2. Using 2 baking sheets, spray with grease or rub your butter/butter substitute on them.  I prefer to put down parchment paper instead.

    20130401-131303.jpg

    Mom Putting Brown Sugar & Butter in Microwave

  3. Melt the butter and brown sugar together in the microwave for about 30 sec – 1 min (depending on the power of your microwave), or over a double boiler at a medium heat.
  4. While mixture is melting, lay out matzah squares on baking sheets.
  5. When mixture is melted, stir it together very well.  (Melted, it shows about 2 cups on the liquid measurer).  The Earth’s Balance doesn’t blend as well as butter, so you really have to stir it to keep it from settling.

    20130401-131317.jpg

    Melted Butter (or substitute) and Brown Sugar

  6. Using a spoon or ladle, pour mixture over matzah so that it is coating it.
    20130401-131329.jpg

    Pouring Mixture Over Matzah

    20130401-131245.jpgBrittle Ready for the Oven


  7. If adding toppings, add the toppings of your choice on top of the matzah and mixture.
  8. Bake in over for 6 minutes at 350*F.
  9. Let cool, and then break into piece.
  10. Store in airtight container.
20130401-131235.jpg

Matzah Brittle


Read Full Post »

Our Kid-Friendly, GF/DF Seder

photo(1)

Having Fun with Friends and Family

Passover is one of my most favorite holidays.  It’s the celebration of the Jewish People leaving Egypt as slaves.  We get together to sing songs and eat and celebrate our freedom.  With several little people at the seder (the passover meal), we revised the way we did things.  We brought in Sammy the Spider’s Passover Haggadah, (the book we use for the order of the seder and the songs).  It was a big hit!!

The Haggadah with Sammy the Spider

photo 1

Sammy the Spider Haggadah

We will confess that though it was the perfect dinner, the haggadah was missing the 4 glasses of wine and the majority of the plagues, that we will add in next time.

The Seder Plate

photo 2

The Seder plate has food on that is symbolic of the Jews leaving Egypt:

  • matzah – is the cracker like bread that the Jews made before leaving Egypt, but didn’t have time to let it rise.  It baked on their backs.
  • the “roasted” egg (though this one was not) – symbolized the renewal and cycle of life generations later
  • an orange – symbolizing solidarity with the LGBT community
  • bitter herbs (usually horseradish) reminds us of the bitter times when we were slaves in Egypt
  • the shank bone (a bone from a lamb, but you can see the dog bone for this one) – represents the lamb that was the special  sacrifice the night before the exodus from Egypt
  • Charoset – the apple, nuts, and wine mixture that represents the mortar of the bricks the Jewish had to make as slaves in Egypt
  • Parsley or Celery dipped in salt water – to symbolize the tears shed by the Jews in slavery

The Matzah

photo 3

Yehudah GF Matzah

The best GF Matzah out there is Yehudah matzah.  It was marked on our table, because it technically can’t be used for sacrimental purposes since it does not contain any wheat.  However, it tastes far better than the gluten matzah (like potato chips) and doesn’t make you constipated!!

Lighting the Candles

photo 4

Lighting the Candles

It is customary to light the candles to welcome the holiday into the home.  Here my daughter and nephew were helping my mom.

Breaking the Middle (GF) Matzah (Afikomen)

photo 5

Breaking the Middle Matzah with Bop

During the Seder, from the stack of 3 matzah on the table, you take the middle one and break it in half.  The larger “half”, called the Afikomen, symbolizes the lamb sacrifice (which is sacrificed no more since the Biblical Jewish Temple was destroyed.  The Afikomen is then wrapped up in a napkin and hidden for the kids to find after the Seder is over.  It’s like their incentive to sit through the whole Seder.  Once it is found, money is usually handed out.  When my mom told everyone they would get a present, my daughter was super excited.  My mom handed out $2 bills and my daughter says, “This is not a present!!”

Appetizer: The Matzah Ball Soup

photo 1

Using Stickers while Awaiting the Soup

photo 2

Yum! The Delicious GF Matzah Ball Soup!

Matzah Ball Soup is on of the traditional foods served at Passover.  A thin chicken stock is used and the balls are made out of matzah meal (ground matzah).  These GF matzah balls were served to all the guests and no one knew the difference.  They were light and fluffy.  They were the best GF matzah balls I’ve had yet.  (See recipe for Gluten-Free Matzah Balls below).

The Meal

photo 3

Utensil-less Eating of the Delicious Passover Meals

photo 1

My Sister and Niece Eating a Yummy GF Meal

The whole meal was gluten-free (and dairy-free), and why not?!!  We had brisket, turkey, carrot souffle, green beans with almonds, and wild rice.  Feel free to ask for any of the recipes.

The Modern Seder

photo 4

My Gma Video-Chatting with her Newest Great-Grand Child

Write and tell me about your Seder traditions and experiences and ways of making it gluten-free and/or kid-friendly!

Mother’s Matzo Balls

adapted from Keneseth Israel Sisterhood Cookbook out of Louisville, Kentucky 1971

photo 2

GF Matzah Ball Soup

Serving Size: about 30, 1.5″ in diameter balls

Ingredients:

photo 3

  • 3 tbsp of chicken fat (skimmed off of the top of homemade chicken stock)
  • 3 eggs, slightly beaten
  • 3/4 cup matzah meal
  • 1 tsp salt
  • 3 tbsp of soup stock
  • pot of stock (we use chicken that we made)

Directions:

  1. Mix fat, eggs, seasoning and liquid.
  2. Add matzah meal and mix lightly until blended.
  3. Cover the mixing bowl and place in the refrigerator for at least 20 minutes.
  4. Bring stock to a brisk boil.
  5. Make matzah balls using about a tsp to scoop them out and drop them into briskly boiling stock.
  6. Cover pot and simmer for 40 minutes.
  7. Enjoy!

Read Full Post »

Gluten-Free Bagel Chips Recipe

I was inspired the other day when I was given a free sample of Udi’s Bagels.  I find them kind of dry and really not worth eating.  I do however think Sweet Note Bakery makes some of the best bagels I’ve tasted!!

Ok, so back to my story . . . I thought to myself, what better way to use these bagels than to make bagel chips. . .

Serving Size: 1 large bagel makes 6-8 large chips depending on how thinly you slice them.

Ingredients:

  • gluten-free bagels
  • olive oil
  • garlic salt
  • pepper
  • paprika

Directions:

  1. Preheat oven to 250*F.  Since we only used 1 bagel, we chose the toaster oven to bake it in.
  2. Slice the bagel as evenly as possible so that they bake evenly.  I recommend a mandolin, but since I didn’t have one, hand slicing did the trick.
  3. Using a brush, lightly brush olive oil over the bagel slice.

    20130322-131503.jpg

    Brushing the Olive Oil on

  4. Sprinkle garlic salt, pepper, and a dash of paprika over them.
  5. Bake for about 20 minutes or until crisp.

    20130322-131516.jpg

    Baking in the Toaster Oven

I apologize for no finished pictures!!  We were so excited to eat them that we forgot to take a picture until it was too late!

Let me know what kinds of delicious variations you have come up with!

Read Full Post »

20130322-131417.jpg

A Slice of the Swiss Chard Artichoke Pie

I was trying to think of something clever to do with my swiss chard, because I’m trying to eat up everything in my refrigerator before heading to visit family for Passover.  So, I came up with this Gluten-Free Swiss Chard and Artichoke Pie using the Chebe dough.

Swiss Chard and Artichoke Pie

adapted from Martha Stewart’s Swiss Chard Pie

Serving Size: 6-8 people, assuming no one is having seconds

Ingredients for the Pie Filling:

  • 2 tablespoons extra-virgin olive oil
  • 1 onion, diced (any kind will do)
  • 4 garlic cloves, minced
  • 2 1/2 pounds Swiss chard, stems cut into small dice and leaves torn (I just used one bunch)
  • 1 can of artichoke hearts, drained and chopped
  • dash of red-pepper flakes (or more to taste.  I was afraid my daughter wouldn’t eat it if it was spicier.)
  • Coarse salt and ground pepper
  • 1/2 cup grated hard cheese (I used a blend of parmeasan and romano)
  • 1 tablespoon fresh lemon juice (I just squeezed in half a lemon and since I have a bunch of Meyer lemons, I used one of those.)
  • 1 large separated into yolk and white

Ingredients for Pie Crust using Chebe All-Purpose Bread Mix:

  • 1 box of chebe all-purpose bread mix
  • 2 eggs, scrambled
  • 2 TBSP of olive oil
  • 3 TBSP water (and a little extra if dry)
  • NOTE: I DO NOT use cheese in the crust.

Supplies:

  • Rolling pin
  • pot for boiling
  • pan for sauteing
  • wooden spoon for stirring
  • parchment paper

Directions for Filling:

  1. Preheat over to 375*F.
  2. Over high heat, bring chard leaves and stems to a boil in a pot of water.  When it reaches a boil, simmer for just a few minutes until they’re wilted.
  3. While the chard is boiling, in another pan, saute onions and garlic in olive oil over medium-high heat until onions soften.  About 2 minutes or so.  I like to cook mine a little longer so some caramelize.
  4. Remove chard from water and squeeze out as much liquid as possible.  Add to saute pan along with the artichokes and chili pepper flakes.
  5. Saute until everything is warmed through, about 3 minutes or so.
  6. Remove from heat and add to pan cheese, egg yolk, lemon juice, and salt and pepper.  (You could do this separately in another bowl, but I thought, why dirty another dish!!)

    20130322-131331.jpg

    Chard Mixture with all Ingredients Mixed In

  7. Grease pie plate well.  I just rubbed olive oil on the bottom of it.
  8. With your pie dough, split it in half and roll out 1/2 between 2 pieces of parchment paper.  (See instructions below).  Remove the top sheet of parchment paper and place pie plate upside down over the crust.  Together, flip the pie plate and the crust over.  Then slowly remove the parchment paper.

    photo 1

    Rolled out Dough

  9. Place the chard mixture on top of the pie crust.
  10. Then, roll out the other 1/2 of the pie crust.  Remove the top parchment sheet, and carefully turn it over and place it on top of the pie.
  11. Pinch the top and bottom crust together as best as you can.
  12. Use the egg white mixed with 1 tsp of water.  Brush on top of the pie.  (I forgot to do this, but it’s why mine is not shiny).
  13. Cut at least 4 vent holes in the top of the pie.

    photo 2

    Sides Pinched, Holes Made

  14. Bake for about 30 minutes.  (Confession. . . I wasn’t really paying attention to how long I cooked it.  I just kept checking on it.  So, if you make this, let me know how long you cooked it for.  I just needed the crust to be cooked through.)

    20130322-131401.jpg

    Cooked Swiss Chard – Artichoke Pie

Directions for Pie Crust:

  1. Mix all wet items in bowl – eggs, oil, and water.  I use a fork for the whole crust until I “knead” my hands 🙂
  2. Add the dry mixture, and continue to use the fork, pushing it down and scraping it across the liquid until it gets clumpy.
  3. At this clumpy point, I stick my hands in and keep kneading it until it is super smooth.  If done right, it should not be sticky at all.  It only gets sticky when too much water is added, so err on the side of caution.  If after about 2-3 minutes of kneading, it is not coming together, add just a tiny bit more water, but do no use as much as a tablespoon.
  4. Split the dough in half, and put one half between 2 pieces of parchment paper.  Roll out until it is a bit wider in diameter than your pie plate, because you want it to come up the sides.
  5. Slowly removed the top parchment paper and put the greased pie plate upside down, over it.  Together, flip them over.
  6. Do the same process in #4 for your 2nd half of the dough.
20130322-131411.jpg

Inside of DELICIOUS Chard and Artichoke Pie

It was truly amazing, and my daughter ate the whole thing!!!  You can also try to make this as little appetizers, by making it in individual muffin tins.

Read Full Post »

20130225-210548.jpg

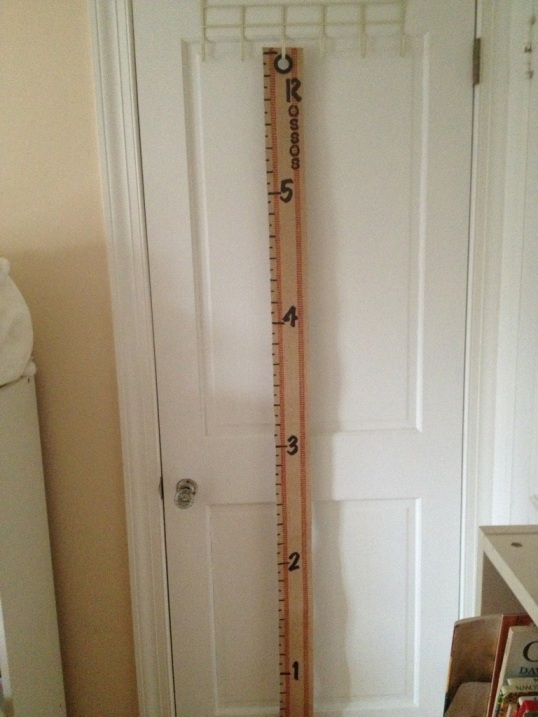
Finished Growth Chart

I LOVE to craft and especially for my friends who have just had babies.

My criteria for making things:

1. It needs to be useful
2. It needs to be something that will be used for more than just a few months
3. It needs to be personal

I decided that I wanted to make something I’d never made before.  So, after doing lots of research, I came across this amazing growth chart from Whipperberry.com, in which the height is pinned on by tags (not featured in the picture above).

The instructions were not as clear as I would have likes, and finding the supplies definitely proved more challenging.  This is what I did and what I’ve learned:

DIY Jute Growth Chart

Supplies:

20130225-210612.jpg

– *Jute (burlap) webbing (it’s about 3.5″ wide), at least 6.5 ft long = 78″ long = about 2.5 – 3 yds if wanting to make the numbers up to 6 ft (.85/yd)
– tape measure (or ruler)
– tape (if using tape measuring to hold it next to chart
– *black shower curtain grommet (1″ in diameter for pack of 8) – from Hobby Lobby 6.99

3 1/4" Round Glass Jar with Flip Lid

3 1/4″ Round Glass Jar with Flip Lid

1" Matte Black Curtain Grommets

1″ Matte Black Curtain Grommets

– hammer (to secure grommet)
– sharp scissors (to cut hole for grommet)
– 1 fine point black sharpie (came in 2 pack for about 2.99)
– 1 ultra fine point black sharpie (came in pack of 2 for 3.99)
– *1 set of stencils with letters and numbers (mine were 2″ sized by C-Thru Better Letter in the “Marker” font) – I got mine at Michael’s, but can’t find them online.  I also recommend getting a smaller size as well.  Hobby Lobby has some fun ones and you can sort by size of the stencil.
– *key tags (from hardware or office supply store) – I used 1/2 the box (7.79 for 50 tags)

20130225-210524.jpg

Book Box

– *extra large safety pins (from craft supply store, the brand I got was care & repair) – about 2.99 for 50
– *3 1/4″ Round Glass Jar with Flip Lid – from Hobby Lobby 1.99
– *box to put finished chart in – I found these cute book boxes at Michael’s (8.99, which I got for 6.29 on sale)

Total Cost*: $34.25 (the items are an investment, but once you have them, then you don’t have to purchase many of them again.

Price of items per chart (dividing everything into individual items): $22.75

Directions:

1. Layout jute and use measuring tape to cut to length you want.  My first one was too short at just 6′, so I would cute it to 6.5 ft or  about 78 inches.

2. Put your grommet in next by lining it up in the center at the top and tracing around it.  I found that I kept having to make my whole a bit wider than I thought.

3. Cut out the hole with your scissors.

4.  Place front and back of grommet around hole.  I tried to use a hammer to get them to snap into place, but I actually found that I had to stand on it with my heel.

20130225-210618.jpg

Measuring Tape Taped to Chart

5. Line up your measuring tape along the side of the jute.  I used clear tape to tape it into place.

6. With my ultra fine point marker, I started by marking all the feet first (i.e. at 12″, 24″, 36″, etc.).  I made about an inch long horizontal line across and it’s about 1/8″ thick.  I did an outline of the rectangle and went back later to fill it in.

7. Then, I used my ultra fine point marker to make small (about 1/4 inch long)  horizontal lines at all the odd numbered inches, starting at 1,3,5, etc., and I made about 1/2 inch long lines at the even numbers.  The even numbered line with all the way to the red stripes.  Again, about 1/8″ thick.

8.  I went back to shade in all the marks with the thicker of the sharpies.

9. Then, I used my stencils and lined them up at the foot marks.  I used my ultra fine sharpie to trace it and the thicker one to fill them in.

10.  Finally, I chose to put the family’s last name on the chart so that both boys could use it.  That was a bit trickier, because I realized I was running out of room between the 6th and 5th foot.  Another reason to make your chart longer so the grommet doesn’t interfere.  I used my stencils with the ultra fine marker to trace the letters and then I filled them in with the thicker one.  I also noticed that I couldn’t use large letters the whole way down, because I was running out of room.  I had to use smaller stencils. 

20130225-210531.jpg

Completed Chart Package

11.  When I was done, I flipped it over on the back to write a personal message.

20130225-210540.jpg

Personal Message on Back of Chart

Please tell me what kinds of creative additions you made to your chart or anything you learned while making it!

Read Full Post »

20130315-175915.jpg

Klehr Dough and Supplies

It was another cold and blustery day here in Philly.  Terribly bone chilling, that I just couldn’t force myself to take my daughter outside.  We called over a friend, and I decided to make some gluten-free play dough.  Well, of course, I was somehow out of rice flour, but found Pamela’s gf flour blend that was past its prime, and decided to try it out.  (Normally I would never use an expensive gf flour blend, but this seemed totally worth not wasting!)  The best part was that my daughter asked if she could eat it, and I made food-grade play dough, so yes, it’s totally edible!

*BIRTHDAY IDEA*:  We made this as give-aways for my daughter’s 3rd birthday.  We bought little containers at the dollar store, and each child got to add colored glitter of choice to his/her container.

When playing with our play dough, we bring out all sorts of utensils from both her kitchen and mine, along with cookie cutters, and b-day candles.  It really adds to the fun!  Tell me what you like to use with your play dough.

Gluten-Free Play Dough Recipe

The Recipe is adapted from Kids with Food Allergies Foundation

Serving Size: 1 batch = will fill a 16 oz container. A double batch will fill a 32 oz yogurt container.

Ingredients:

zqb-30891b_1z

India Tree All-Natural Food Dye

– 1+1/4 cup of rice flour or gf flour blend (I have done both and come out great!)
– 1/2 cup of salt (I used Himalayan salt, and it turned the dough a light pink)
– 2 tsp cream of tartar
– 1 cup water
– 1 tbsp oil
– 1/4 tsp gf vanilla (I use frontier vanilla flavor, so there’s no alcohol involved)
– glitter or sparkles (optional)
– food coloring (optional) – I like to use all natural (GF) food coloring from India Tree

Supplies:

– large pot
– mixing spoon or spatula
– measuring cups and spoons
– airtight container to put play dough in
– cookie cutters (optional)
– b-day candles (optional)

Directions:

1. Mix dry ingredients in large pot first: flour, salt, cream of tartar
2. Add water and oil and mix
3. Heat over the stove top at a medium heat.
4. Stir constantly for about 5 minutes, until mixture pulls away from sides.
5. Add vanilla and mix thoroughly.*
6. When cool, place in air tight container. (We like to reuse old yogurt containers.)

*Options:
1. You can add food coloring to the water before you stir it in.  You can always add it after you’ve made the dough, but it will stain your hands.
2. You can add sparkles or glitter to the batch once its made.

Read Full Post »

20130312-104725.jpg

Spring Rolls with homemade duck sauce and sweet and sour sauce

I was having take out dinner with a few friends, where I of course brought my own food.  They had some kind of Asian cuisine, which made me crave spring rolls.  So, I figured out how to make delicious spring rolls.

Gluten-Free Spring Rolls

Serving Size: 12 Spring Rolls

Ingredients for Spring Rolls:

– 1 package of rice wrappers
any vegetables on hands:
– 1 carrot, julienned
– 1 zucchini, julienned
– 1 squash, julienned
– 1 package of  mushrooms, thinly sliced
– 1/2 cabbage, shredded (I used purple)
– 1/2 – 1 onion, thinly sliced
– oil for frying (peanut, canola, safflower, soy)

Supplies for Spring Rolls:

– shallow pan (for wetting wrappers)
– saute pan
– deep pot for frying (so to avoid splatter)
– tongs

Directions:

1. Chop all of the vegetables.
2. Over medium-high heat, saute the onions first for about a minute, then add in the rest of the vegetables and cook until tender, 5-7 minutes.
3. In another shallow pan, fill about an inch full of room temperature water.  One at a time, place the rice wrapper in the water (following directions on package) for about 30 seconds or so, until it softens.
4. After each wrapper is soft, place it on a clean surface (like a cutting board), and fill the center with about 1/4 cup of vegetable mixture.  Be careful, because the wrapper are a bit sticky and can tear.  However, it’s pretty easy to roll over the tear because the wrapper will stick to itself.

20130312-104653.jpg

Roller Rice Wrappers before Frying

5. Fold each wrapper by folding over one long side first, then folding in both the shorter sides, then rolling it to wrap the rest of the longer side.
6. With a couple of wrappers left to fill, add about 1/2 in of oil your tall frying pot and heat over medium-high to high heat.  You should see it begins to smoke, which tells you it’s ready.  I chose not to put more oil in for a super deep fry.  I never want to end up with too much!
7. Depending on how wide your pot is, ONLY put 1-2 rolls in at a time.  They will stick to each other and fall apart.  I started with 1 at a time.  I fried it for about 2 minutes, rolling it about every 30 seconds so the other sides could brown.

20130312-104735.jpg

Spring Roll Frying

8. Remove from frying pot and place on a baking sheet covered in brown paper bags for oil absorption and cooling.

20130312-104747.jpg

Duck Sauce on Left and Sweet and Sour on Right

9. When all are cooked, serve with dipping sauces.  (Recipes below).

20130312-104712.jpg

Spring Roll with Dipping Sauces

Recipes for Sauces

These sauces are taken verbatim from cooks.com and will also provide the links below.

20130312-104636.jpg

Duck Sauce on Left, Sweet and Sour on Right

Ingredients for Duck Sauce:

Serving Size: about 1.5 pints (it filled up 1 1/2 small jam jars)

acv

Bragg Cider Vinegar

Duck Sauce

1 c. plum preserves (I had made my own from the summer!!)
1/2 c. apricot preserves
2 tbsp. honey (I like to use local honey)
2/3 c. cider vinegar (I used braggs apple cider vinegar)
1 clove garlic, minced

Mix ingredients in a saucepan; bring to a boil over medium heat. Cook 5 minutes, stirring constantly. Store in sterilized jar in refrigerated.

Ingredients for Sweet and Sour Sauce:

Serving Size: 1/2 pint (it filled 1/2 a small jam jar)

Sweet and Sour Sauce

3 tbsp. vinegar (I used white vinegar)
1/2 c. orange juice
1/2 c. brown sugar
1 tbsp. cornstarch mixed in 1 tbsp. water

Combine all ingredients in small saucepan. Bring to a boil while stirring constantly. Turn down and simmer 5 minutes or until thick. Add a dash of red food coloring for color (optional). Cool and serve. May want to double the recipe.

Read Full Post »

20130225-211224.jpg

Spinach Muffins

I was inspired by a friend, Elana, several years ago to find more creative ways to make vegetables for my little eater who was probably about 1.5 then. The name makes it sound a good deal more playful and interesting to a toddler. This recipe has inspired me to create others similar and for no other reason than it is soo simple and literally takes less than 5 minutes to mix all the ingredients.  I have used it as an appetizer.  It tastes just like a crustless Spanikopita.

Gluten-Free Spinach Muffins

Serving Size: about 24 mini-muffins

Ingredients:

20130225-211212.jpg

Spinach Muffin Ingredients

– 1 egg
– 1 box of 10 oz frozen spinach (or more) or any other veggie.  (If using fresh veggies, make sure you steam them for about 3 minutes first).
– 1/2 16 oz. container of cottage cheese (can substitute ricotta)
– 1 cup of shredded cheese (I use cheddar, but any kind is fine)
– 1/2 tsp salt or to taste
– 1/2 tsp pepper or to taste

Supplies:

– mini-muffin tin (you can use a bigger one, but I don’t know how many it will make)
– cooking spray
– mixing spoon
– bowl
– spatula

Directions:

1. Preheat oven to 350.
2. Grease muffin pan REALLY well.  Because there is cheese in this, it sticks.  I’ve tried using muffin liners, but the cheese sticks to those, too, and makes them difficult to eat.
3. Mix all the above ingredients together.  (I often don’t measure and just eyeball everything).
4. Spoon batter into muffin tins.
5. Cook for about 20-25 minutes, until the edges start to lightly brown.

20130225-211218.jpg

Fresh Out-of-the-Oven Spinach Muffins

Read Full Post »

20130310-140246.jpg

Blueberry Dutch Pancake

So, the way this recipe came about wast this . . . our friends were coming in town and we and another local couple decided we would host them for brunch.  My local friends decided to make frittatas, and I decided I would make some kind of baked good.   Then, our out-of-towner friends had a change of plans and couldn’t make it.  Our local friends and I decided we should still get together.

Since we weren’t going to be at my house and pancakes were way too time consuming, I came up with the dutch pancake and maple and brown sugar oatmeal using my oats from GF Harvest.  (If you want to see how I made blueberries and cream oatmeal, then click here.) I think I made everything in about 30 minutes.

This was indeed a great decision.  Since I’m dairy-free right now, I thought about making it full of dairy and just not eating it, afraid it would come out kind of gross, but that was NOT the case.  It was amazing and we had none left after feeding 4 adults and 3 kids!!

Berry Dutch Pancakes

gluten free, soy free, dairy free

Serving size: 8-10 (2 pie plates or 13×9 pyrex dish)

I doubled my recipe, so if you want to halve it, it will fit into 1 pyrex pie dish or cast iron skillet.

Ingredients:

23131-FR-Vanilla

Frontier Vanilla Flavor

1-2 tbsp butter – I used earth’s balance
2 cup milk – 1 cup rice milk & 1 cup coconut milk* (see directions for this below)
4 eggs
1 1/3 c. flour = 166.67 g of gf flour or less than 1 1/3 cup of flour
2 tbsp sweetener – 1 tbsp sugar + 1 tbsp maple syrup (grade b)
1 tsp salt
1 tsp vanilla extract (I make my own, but the safest GF kind is frontier vanilla flavor.)
1 tbsp of powdered sugar (I just put my sugar in the coffee grinder to get powdered sugar)
1 large handful of berries (Any kind will do.  I used blueberries, because that’s what I had on hand.)

Pancake Directions:

  1. Heat oven to 400*F.
  2. Place butter in pyrex dish and place in oven.
  3. While butter is melting, whisk together milk, eggs, sugar/maple syrup, salt.  Then slowly add in flour.
  4. Remove dish from oven and pour in batter.
  5. Sprinkle batter with berries.  (So, I accidentally forgot this step and just threw them on after they came out of the oven.)
  6. Bake for 25 minutes.
  7. Remove and sprinkle powdered sugar on top.
20130310-140256.jpg

GF Brunch with Friends

Coconut Milk Ingredients:

Native-Forest-Organic-Coconut-Milk-043182002080

Coconut Milk

1 Can of coconut milk1/2 can of water

Coconut Milk Directions:

1. Pour coconut milk from can into container with lid (so that you can shake it).
2. Add 1/2 can of water to the canned milk.
3. Shake the 2 together.

If you want to make a drink out of it, add honey to taste.  It’s delicious and refreshing!

Read Full Post »

20130305-121038.jpg

The GF Taco

GF, SF Taco Recipe

(Can be made DF, vegetarian, and vegan by leaving out meat and dairy products or substituting)

Serving Size: About 8-12 tacos with other filling

Taco Ingredients:

20130305-121102.jpg

Taco Toppings

Garden-of-Eatin-Yellow-Corn-Taco-Shells-015839007311

Garden of Eatin Corn Tacos

– 1 Box (12 tacos) of ONLY corn hard shell tortillas (We use either Bearitos Taco Shell or Garden of Eatin’

images

Bearitos Corn Tacos

Yellow Corn Taco Shells )
– 1 – 1.5 lbs of ground meat (we use ground breast turkey meat) or beans or other meat substitute
– 2-4 TBSP of gf taco seasoning (recipe below)
– 3 tomatoes chopped
– 1-2 handfuls of spinach, roughly chopped
– 1 onion, thinly sliced
– 2 avocados, diced
– 1-2 handfuls of cilantro, chopped
– 1 cup of shredded cheese (optional)
– jar of salsa
– container of sour cream (optional)
– any other fun ingredients

Taco Directions:

1. Brown taco meat by placing it in a skillet and stirring every now and again. (This should only take 7-10 minutes). I like to use a non-stick so I don’t need to use any oil. Once the meat begins to brown, I add 2-4 TBSP of taco seasoning and 1/3 cup of water. I mix that together and then taste. Sometimes I might need to add more water, so just keep an eye on the meat.

2. While the meat is cooking you can warm taco shells by the directions on the package. I often use my toaster oven when not making more than 6.
3. Also while the meat is cooking, I prep all the veggies. Sometimes I even prep them ahead of time.

4. Assemble the taco. I tend to layer in the veggies first and then put on the meat so that the meat weighs down the veggies and keeps them from popping out.

5. The finale . . . toppings – I love to put salsa on top, but perhaps you might enjoy sour cream or something else!

6. Serve with salad or bed of rice or just by itself!

Taco Seasoning Ingredients

Servings: I would guestimate about 8-10 TBSP

(I have no idea where I originally got this recipe from, but it has been adapted.)

– 1/4 cup dried onions, minced (sometimes I use powdered)1/4 cup chili powder
– 1 TBSP salt
– 4 tsp cornstarch
– 1 TBSP dried garlic, minced (sometimes I use powdered)
– 1 TBSP cumin, ground
– 1 TBSP red pepper flakes, crushed
– 1+1/2 tsp dried oregano (either powdered or flakes)

Taco Seasoning Directions:

1. Mix all the seasonings together in an airtight container. (I like to use a glass jar with a tight fitting lid). It should keep 6 months – 1 year, but I always use mine up before then.

2. When ready to use, you need about 2-4 TBSP of seasoning (to taste) and 1/3-1/2 cup of water to 1 lb. of cooked meat. Spoon into the pan after you have begun to brown the meat.

Read Full Post »

20130228-091626.jpg

My Daughter Posing with her Gluten-Free Jewel Pop

This is a quick and easy gluten-free, dairy-free, soy-free, vegan snack.

Lemonade Popsicles

Ingredients:

– Fruit juice of any kind – we used lemonade aid, (but you can also reconstitute the frozen kind,too)

80-3879_Jewel Pop Molds-Main

Tovolo Jewel Pop Molds

Supplies:

– Popsicle molds or Dixie cups and Popsicle sticks
(We love our Tovolo Freezer Jewel Pop Molds, Set of 6, because they’re a perfect size and fit right on your finger!)

Directions:

1. Pour lemonade aid or fruit juice into molds*.
2. Put in freezer. The amount if time will depend on how large your Popsicles are.

*NOTE: If using Dixie cups and Popsicle sticks, you might want to place a piece of aluminum foil over the cup, make a small hole in the center for the stick, and put the stick through the hole. That way, the stick will not fall over.

Read Full Post »

Older Posts »

Diane Ravitch's blog

A site to discuss education and democracy

APS Today

The official blog of Atlanta Public Schools

Granted, and...

thoughts on education by Grant Wiggins

Celiac Central: Bits and Bites

National Foundation for Celiac Awareness staff members dish and digest

Maia Toll

Gluten-Free Food and Fun

WRiteLiveLily

A Catalog of Writing-in-Progress

Invision Events: Wedding Planner | Day Of Wedding Coordinator | Atlanta | Birmingham | Montgomery | Auburn | Dallas | Ft. Worth

Wedding Planner and Day Of Wedding Coordinator for Georgia and Alabama | Atlanta | Birmingham | Montgomery | Auburn | Mobile | Dallas | Ft. Worth

StressLess Views and other TidBits

Gluten-Free Food and Fun

Happy Go Lucky & Gluten Free

Gluten-Free Food and Fun

Gluten Freedoms' Blog

Gluten-Free Food and Fun