Feeds:
Posts
Comments

Archive for the ‘Uncategorized’ Category

IMG_4502

GF Harvest Oats

When I was pregnant with my daughter, I found myself craving oatmeal.  I mean, the cravings were so bad that I started dreaming about it, too!  I had been to afraid to try oats once I was diagnosed with celiac disease.  I didn’t trust that they could really be safe.  So, I did a good deal of research and came across the GF Harvest Company.  Honestly, it sounded too good to be true.  Of course I called them up to legitimize my cravings.  Not only did they kindly sent me samples of Steel Cut Oats, Old-Fashioned Rolled Oats, and Oatmeal Cookie Crisp Granola, but they also provided lots of useful information.  (They also carry gluten-free groats and gluten-free oat flour.)  I was overjoyed to have satisfied my craving, with the knowledge that these were gluten-free right down to the ground.

It turned out that Seaton Smith, the owner of this small, Celiac disease-family run company, was tickled pink to talk and tell me all about their oats while assuaging my fears and anxieties.  And, in 2013 they were even awarded the BBB Torch Awards for Ethics.  I learned so much about the processing of their oats and the scrutiny his oats go through to make sure there is no cross-contamination.  Here are a few things I learned and why I am now GF Harvest’s biggest fan:

To read more, click here . . .

This article can also be found on the National Foundation for Celiac Awareness’s Gluten-Free Hot Products Page

A Special Thanks goes out to my friend, Jessica Schaefer, who used these oats to make me special gf oatmeal cookies!

photo

Apple Crumble with GF Harvest Oats on top

Read Full Post »

https://i0.wp.com/glutenfreehotproducts.com/wp-content/uploads/2014/02/grammy-crisps.jpg

Cheezy Crisps & Grammy Crisps

Are you always on the hunt for the perfect gluten-free cracker?  Finding them too bland, tasting like cardboard, or flimsy?  Well, I definitely am!  Every time I go to the grocery store, I’m always scanning the cracker aisle, looking for a suitable gluten-free cracker to replace all those buttery, flaky, gluten ones, and yet, I’ve been hard pressed to find a replacement . . . until today!

So, you can imagine my surprise when I ventured to try Crunchmaster’s certified gluten-free Cheezy Crisps and Grammy Crisps and was wowed to the max!

To read more, click here . . .

This article can also be found on the National Foundation for Celiac Awareness’s Gluten-Free Hot Products Page

A special thanks goes out to Stephanie Gill, Pam Vassilikos, and of course my daughter who were instrumental in the reviewing of the crackers!

Read Full Post »

I was fortunately to be invited to my dear friends’ house for Passover dinner while I was in Atlanta.  Rebecca is a fantastic cook, and they always serve the most wonderful food.   The best part about it was that it was all gluten-free (and soy-free), because neither of which you can have on Passover!!  And on top of that, two of their kids have Celiac Disease, which just means I can eat with them and always feel good!

This recipe has been adapted from both my mom’s version (which usually uses Ramen Noodles) and Rebecca’s version with candied nuts.  I had leftover chicken to through in, which just made it even better!  This is a great, fast dish to take to potlucks and parties.

On a side note, my husband who had refused to eat it upon hearing its name, decided it was delicious and really enjoyed the candied nut addition.

Oriental Cabbage Salad with Candied Nuts Recipe

20130412-143356.jpg

Oriental Cabbage Salad

Serving Size: If used as a side dish about 12 people

Storage Note:  I store the chicken, nuts, and dressing separate from the other salad ingredients to keep them from getting soggy and gross.

Ingredients for Cabbage Salad:

(feel free to leave off or add any ingredients as you see fit)

  • 1 cabbage, shredded or cut super thin
  • 4-5 carrots, grated
  • a bunch of scallions, chopped (but since I didn’t have any, I used about 1/2 an onion)
  • *Optional: pre-cooked chicken, chopped into small pieces (I used grilled chicken from the previous night)
  • candied nuts (click here for recipe) – (*If vegan, just toast nuts instead*)

Ingredients for Oriental Dressing:

  • 3/4 cup of  safflower oil (or some other non-tasting oil)
  • 1/4 cup of sesame oil
  • 1/3 cup cider vinegar
  • 1/4 cup of honey (you can substitute this for sugar as well)
  • 1/4 cup of sugar

Directions for Cabbage Salad:

  1. Mix together cabbage, onions, carrots in a large bowl.
  2. When ready to serve, add chicken and candied nuts.
  3. Pour dressing on last, so the salad doesn’t get soggy.

Directions for Salad Dressing:

  1. In a large measuring cup, pour in the vinegar and sugar/honey and whisk it till well combined.
  2. Add in the cider vinegar a little at a time while continuing to whisk.
20130412-143350.jpg

Oriental Salad Ready to Eat!

Read Full Post »

Candied Nuts

Candied Nuts

So I had eaten at my dear friends’ house over Passover and had the most amazing Oriental Cabbage Salad.  Rebecca’s secret ingredient was candied nuts.  I decided I was going to replicate her dish, but first I had to candy my nuts.  (I’ll post the oriental cabbage later).

There are two ways to candy nuts.  I did mine in the oven, but you can also just put sugar and nuts in a saute pan and saute them.  Once the sugar has melted and is well coated, you then spread the nut mixture on a baking sheet with parchment paper to cool and then break it into pieces.

However, this was the recipe I found years ago and adapted it slightly.  I have no idea where it came from, so I can’t take credit for it.  I love to mix different kinds of nuts together.  I think this recipe can double as the makings of a granola bar.  Let me know what you come up with!  I also like to just eat it as snack.  I have tried it substituting honey for sugar.  It’s just as tasty, but doesn’t quite have the crispness or the crunch I was looking for.  If you try different things, let me know what you enjoyed!

Candied Nuts Recipe

Serving Size: 1 pound

Ingredients:

  • 1 cup granulated sugar
  • 1 teaspoon salt
  • 1 teaspoon ground cinnamon
  • 1 pound nuts, crushed or halved
  • 1 large egg white, at room temperature
  • 1 tablespoon water

Directions:

  1. Preheat oven to 300*F (150*C).
  2. Lay parchment paper over a baking sheet.
  3. *If using whole nuts, crush prior to using.  Place in ziplock bag and smash with mallet.*  I of course didn’t have anything else when I was having a craving, so it’s what I did.

    20130410-142216.jpg

    Crushing Nuts

  4. In a bowl, mix together sugar, salt and cinnamon;set aside.
  5. Beat egg white and water together just until frothy, not stiff.
  6. Add nuts to egg whites and stir until well coated.

    20130410-142201.jpg

    Nuts Added to Egg White Mixture

  7. Add sugar mixture, mixing nuts until well coated.
  8. Spread evenly onto a foil-lined cookie sheet.
  9. Bake for 30 minutes. Remove from oven and separate pecans as they cool.
  10. Store in tightly closed container.
Candied Nuts

Candied Nuts

Read Full Post »

Gluten-Free Bagel Chips Recipe

I was inspired the other day when I was given a free sample of Udi’s Bagels.  I find them kind of dry and really not worth eating.  I do however think Sweet Note Bakery makes some of the best bagels I’ve tasted!!

Ok, so back to my story . . . I thought to myself, what better way to use these bagels than to make bagel chips. . .

Serving Size: 1 large bagel makes 6-8 large chips depending on how thinly you slice them.

Ingredients:

  • gluten-free bagels
  • olive oil
  • garlic salt
  • pepper
  • paprika

Directions:

  1. Preheat oven to 250*F.  Since we only used 1 bagel, we chose the toaster oven to bake it in.
  2. Slice the bagel as evenly as possible so that they bake evenly.  I recommend a mandolin, but since I didn’t have one, hand slicing did the trick.
  3. Using a brush, lightly brush olive oil over the bagel slice.

    20130322-131503.jpg

    Brushing the Olive Oil on

  4. Sprinkle garlic salt, pepper, and a dash of paprika over them.
  5. Bake for about 20 minutes or until crisp.

    20130322-131516.jpg

    Baking in the Toaster Oven

I apologize for no finished pictures!!  We were so excited to eat them that we forgot to take a picture until it was too late!

Let me know what kinds of delicious variations you have come up with!

Read Full Post »

20130322-131417.jpg

A Slice of the Swiss Chard Artichoke Pie

I was trying to think of something clever to do with my swiss chard, because I’m trying to eat up everything in my refrigerator before heading to visit family for Passover.  So, I came up with this Gluten-Free Swiss Chard and Artichoke Pie using the Chebe dough.

Swiss Chard and Artichoke Pie

adapted from Martha Stewart’s Swiss Chard Pie

Serving Size: 6-8 people, assuming no one is having seconds

Ingredients for the Pie Filling:

  • 2 tablespoons extra-virgin olive oil
  • 1 onion, diced (any kind will do)
  • 4 garlic cloves, minced
  • 2 1/2 pounds Swiss chard, stems cut into small dice and leaves torn (I just used one bunch)
  • 1 can of artichoke hearts, drained and chopped
  • dash of red-pepper flakes (or more to taste.  I was afraid my daughter wouldn’t eat it if it was spicier.)
  • Coarse salt and ground pepper
  • 1/2 cup grated hard cheese (I used a blend of parmeasan and romano)
  • 1 tablespoon fresh lemon juice (I just squeezed in half a lemon and since I have a bunch of Meyer lemons, I used one of those.)
  • 1 large separated into yolk and white

Ingredients for Pie Crust using Chebe All-Purpose Bread Mix:

  • 1 box of chebe all-purpose bread mix
  • 2 eggs, scrambled
  • 2 TBSP of olive oil
  • 3 TBSP water (and a little extra if dry)
  • NOTE: I DO NOT use cheese in the crust.

Supplies:

  • Rolling pin
  • pot for boiling
  • pan for sauteing
  • wooden spoon for stirring
  • parchment paper

Directions for Filling:

  1. Preheat over to 375*F.
  2. Over high heat, bring chard leaves and stems to a boil in a pot of water.  When it reaches a boil, simmer for just a few minutes until they’re wilted.
  3. While the chard is boiling, in another pan, saute onions and garlic in olive oil over medium-high heat until onions soften.  About 2 minutes or so.  I like to cook mine a little longer so some caramelize.
  4. Remove chard from water and squeeze out as much liquid as possible.  Add to saute pan along with the artichokes and chili pepper flakes.
  5. Saute until everything is warmed through, about 3 minutes or so.
  6. Remove from heat and add to pan cheese, egg yolk, lemon juice, and salt and pepper.  (You could do this separately in another bowl, but I thought, why dirty another dish!!)

    20130322-131331.jpg

    Chard Mixture with all Ingredients Mixed In

  7. Grease pie plate well.  I just rubbed olive oil on the bottom of it.
  8. With your pie dough, split it in half and roll out 1/2 between 2 pieces of parchment paper.  (See instructions below).  Remove the top sheet of parchment paper and place pie plate upside down over the crust.  Together, flip the pie plate and the crust over.  Then slowly remove the parchment paper.

    photo 1

    Rolled out Dough

  9. Place the chard mixture on top of the pie crust.
  10. Then, roll out the other 1/2 of the pie crust.  Remove the top parchment sheet, and carefully turn it over and place it on top of the pie.
  11. Pinch the top and bottom crust together as best as you can.
  12. Use the egg white mixed with 1 tsp of water.  Brush on top of the pie.  (I forgot to do this, but it’s why mine is not shiny).
  13. Cut at least 4 vent holes in the top of the pie.

    photo 2

    Sides Pinched, Holes Made

  14. Bake for about 30 minutes.  (Confession. . . I wasn’t really paying attention to how long I cooked it.  I just kept checking on it.  So, if you make this, let me know how long you cooked it for.  I just needed the crust to be cooked through.)

    20130322-131401.jpg

    Cooked Swiss Chard – Artichoke Pie

Directions for Pie Crust:

  1. Mix all wet items in bowl – eggs, oil, and water.  I use a fork for the whole crust until I “knead” my hands 🙂
  2. Add the dry mixture, and continue to use the fork, pushing it down and scraping it across the liquid until it gets clumpy.
  3. At this clumpy point, I stick my hands in and keep kneading it until it is super smooth.  If done right, it should not be sticky at all.  It only gets sticky when too much water is added, so err on the side of caution.  If after about 2-3 minutes of kneading, it is not coming together, add just a tiny bit more water, but do no use as much as a tablespoon.
  4. Split the dough in half, and put one half between 2 pieces of parchment paper.  Roll out until it is a bit wider in diameter than your pie plate, because you want it to come up the sides.
  5. Slowly removed the top parchment paper and put the greased pie plate upside down, over it.  Together, flip them over.
  6. Do the same process in #4 for your 2nd half of the dough.
20130322-131411.jpg

Inside of DELICIOUS Chard and Artichoke Pie

It was truly amazing, and my daughter ate the whole thing!!!  You can also try to make this as little appetizers, by making it in individual muffin tins.

Read Full Post »

20130312-104725.jpg

Spring Rolls with homemade duck sauce and sweet and sour sauce

I was having take out dinner with a few friends, where I of course brought my own food.  They had some kind of Asian cuisine, which made me crave spring rolls.  So, I figured out how to make delicious spring rolls.

Gluten-Free Spring Rolls

Serving Size: 12 Spring Rolls

Ingredients for Spring Rolls:

– 1 package of rice wrappers
any vegetables on hands:
– 1 carrot, julienned
– 1 zucchini, julienned
– 1 squash, julienned
– 1 package of  mushrooms, thinly sliced
– 1/2 cabbage, shredded (I used purple)
– 1/2 – 1 onion, thinly sliced
– oil for frying (peanut, canola, safflower, soy)

Supplies for Spring Rolls:

– shallow pan (for wetting wrappers)
– saute pan
– deep pot for frying (so to avoid splatter)
– tongs

Directions:

1. Chop all of the vegetables.
2. Over medium-high heat, saute the onions first for about a minute, then add in the rest of the vegetables and cook until tender, 5-7 minutes.
3. In another shallow pan, fill about an inch full of room temperature water.  One at a time, place the rice wrapper in the water (following directions on package) for about 30 seconds or so, until it softens.
4. After each wrapper is soft, place it on a clean surface (like a cutting board), and fill the center with about 1/4 cup of vegetable mixture.  Be careful, because the wrapper are a bit sticky and can tear.  However, it’s pretty easy to roll over the tear because the wrapper will stick to itself.

20130312-104653.jpg

Roller Rice Wrappers before Frying

5. Fold each wrapper by folding over one long side first, then folding in both the shorter sides, then rolling it to wrap the rest of the longer side.
6. With a couple of wrappers left to fill, add about 1/2 in of oil your tall frying pot and heat over medium-high to high heat.  You should see it begins to smoke, which tells you it’s ready.  I chose not to put more oil in for a super deep fry.  I never want to end up with too much!
7. Depending on how wide your pot is, ONLY put 1-2 rolls in at a time.  They will stick to each other and fall apart.  I started with 1 at a time.  I fried it for about 2 minutes, rolling it about every 30 seconds so the other sides could brown.

20130312-104735.jpg

Spring Roll Frying

8. Remove from frying pot and place on a baking sheet covered in brown paper bags for oil absorption and cooling.

20130312-104747.jpg

Duck Sauce on Left and Sweet and Sour on Right

9. When all are cooked, serve with dipping sauces.  (Recipes below).

20130312-104712.jpg

Spring Roll with Dipping Sauces

Recipes for Sauces

These sauces are taken verbatim from cooks.com and will also provide the links below.

20130312-104636.jpg

Duck Sauce on Left, Sweet and Sour on Right

Ingredients for Duck Sauce:

Serving Size: about 1.5 pints (it filled up 1 1/2 small jam jars)

acv

Bragg Cider Vinegar

Duck Sauce

1 c. plum preserves (I had made my own from the summer!!)
1/2 c. apricot preserves
2 tbsp. honey (I like to use local honey)
2/3 c. cider vinegar (I used braggs apple cider vinegar)
1 clove garlic, minced

Mix ingredients in a saucepan; bring to a boil over medium heat. Cook 5 minutes, stirring constantly. Store in sterilized jar in refrigerated.

Ingredients for Sweet and Sour Sauce:

Serving Size: 1/2 pint (it filled 1/2 a small jam jar)

Sweet and Sour Sauce

3 tbsp. vinegar (I used white vinegar)
1/2 c. orange juice
1/2 c. brown sugar
1 tbsp. cornstarch mixed in 1 tbsp. water

Combine all ingredients in small saucepan. Bring to a boil while stirring constantly. Turn down and simmer 5 minutes or until thick. Add a dash of red food coloring for color (optional). Cool and serve. May want to double the recipe.

Read Full Post »

20130225-211224.jpg

Spinach Muffins

I was inspired by a friend, Elana, several years ago to find more creative ways to make vegetables for my little eater who was probably about 1.5 then. The name makes it sound a good deal more playful and interesting to a toddler. This recipe has inspired me to create others similar and for no other reason than it is soo simple and literally takes less than 5 minutes to mix all the ingredients.  I have used it as an appetizer.  It tastes just like a crustless Spanikopita.

Gluten-Free Spinach Muffins

Serving Size: about 24 mini-muffins

Ingredients:

20130225-211212.jpg

Spinach Muffin Ingredients

– 1 egg
– 1 box of 10 oz frozen spinach (or more) or any other veggie.  (If using fresh veggies, make sure you steam them for about 3 minutes first).
– 1/2 16 oz. container of cottage cheese (can substitute ricotta)
– 1 cup of shredded cheese (I use cheddar, but any kind is fine)
– 1/2 tsp salt or to taste
– 1/2 tsp pepper or to taste

Supplies:

– mini-muffin tin (you can use a bigger one, but I don’t know how many it will make)
– cooking spray
– mixing spoon
– bowl
– spatula

Directions:

1. Preheat oven to 350.
2. Grease muffin pan REALLY well.  Because there is cheese in this, it sticks.  I’ve tried using muffin liners, but the cheese sticks to those, too, and makes them difficult to eat.
3. Mix all the above ingredients together.  (I often don’t measure and just eyeball everything).
4. Spoon batter into muffin tins.
5. Cook for about 20-25 minutes, until the edges start to lightly brown.

20130225-211218.jpg

Fresh Out-of-the-Oven Spinach Muffins

Read Full Post »

20130310-140246.jpg

Blueberry Dutch Pancake

So, the way this recipe came about wast this . . . our friends were coming in town and we and another local couple decided we would host them for brunch.  My local friends decided to make frittatas, and I decided I would make some kind of baked good.   Then, our out-of-towner friends had a change of plans and couldn’t make it.  Our local friends and I decided we should still get together.

Since we weren’t going to be at my house and pancakes were way too time consuming, I came up with the dutch pancake and maple and brown sugar oatmeal using my oats from GF Harvest.  (If you want to see how I made blueberries and cream oatmeal, then click here.) I think I made everything in about 30 minutes.

This was indeed a great decision.  Since I’m dairy-free right now, I thought about making it full of dairy and just not eating it, afraid it would come out kind of gross, but that was NOT the case.  It was amazing and we had none left after feeding 4 adults and 3 kids!!

Berry Dutch Pancakes

gluten free, soy free, dairy free

Serving size: 8-10 (2 pie plates or 13×9 pyrex dish)

I doubled my recipe, so if you want to halve it, it will fit into 1 pyrex pie dish or cast iron skillet.

Ingredients:

23131-FR-Vanilla

Frontier Vanilla Flavor

1-2 tbsp butter – I used earth’s balance
2 cup milk – 1 cup rice milk & 1 cup coconut milk* (see directions for this below)
4 eggs
1 1/3 c. flour = 166.67 g of gf flour or less than 1 1/3 cup of flour
2 tbsp sweetener – 1 tbsp sugar + 1 tbsp maple syrup (grade b)
1 tsp salt
1 tsp vanilla extract (I make my own, but the safest GF kind is frontier vanilla flavor.)
1 tbsp of powdered sugar (I just put my sugar in the coffee grinder to get powdered sugar)
1 large handful of berries (Any kind will do.  I used blueberries, because that’s what I had on hand.)

Pancake Directions:

  1. Heat oven to 400*F.
  2. Place butter in pyrex dish and place in oven.
  3. While butter is melting, whisk together milk, eggs, sugar/maple syrup, salt.  Then slowly add in flour.
  4. Remove dish from oven and pour in batter.
  5. Sprinkle batter with berries.  (So, I accidentally forgot this step and just threw them on after they came out of the oven.)
  6. Bake for 25 minutes.
  7. Remove and sprinkle powdered sugar on top.
20130310-140256.jpg

GF Brunch with Friends

Coconut Milk Ingredients:

Native-Forest-Organic-Coconut-Milk-043182002080

Coconut Milk

1 Can of coconut milk1/2 can of water

Coconut Milk Directions:

1. Pour coconut milk from can into container with lid (so that you can shake it).
2. Add 1/2 can of water to the canned milk.
3. Shake the 2 together.

If you want to make a drink out of it, add honey to taste.  It’s delicious and refreshing!

Read Full Post »

20130305-121038.jpg

The GF Taco

GF, SF Taco Recipe

(Can be made DF, vegetarian, and vegan by leaving out meat and dairy products or substituting)

Serving Size: About 8-12 tacos with other filling

Taco Ingredients:

20130305-121102.jpg

Taco Toppings

Garden-of-Eatin-Yellow-Corn-Taco-Shells-015839007311

Garden of Eatin Corn Tacos

– 1 Box (12 tacos) of ONLY corn hard shell tortillas (We use either Bearitos Taco Shell or Garden of Eatin’

images

Bearitos Corn Tacos

Yellow Corn Taco Shells )
– 1 – 1.5 lbs of ground meat (we use ground breast turkey meat) or beans or other meat substitute
– 2-4 TBSP of gf taco seasoning (recipe below)
– 3 tomatoes chopped
– 1-2 handfuls of spinach, roughly chopped
– 1 onion, thinly sliced
– 2 avocados, diced
– 1-2 handfuls of cilantro, chopped
– 1 cup of shredded cheese (optional)
– jar of salsa
– container of sour cream (optional)
– any other fun ingredients

Taco Directions:

1. Brown taco meat by placing it in a skillet and stirring every now and again. (This should only take 7-10 minutes). I like to use a non-stick so I don’t need to use any oil. Once the meat begins to brown, I add 2-4 TBSP of taco seasoning and 1/3 cup of water. I mix that together and then taste. Sometimes I might need to add more water, so just keep an eye on the meat.

2. While the meat is cooking you can warm taco shells by the directions on the package. I often use my toaster oven when not making more than 6.
3. Also while the meat is cooking, I prep all the veggies. Sometimes I even prep them ahead of time.

4. Assemble the taco. I tend to layer in the veggies first and then put on the meat so that the meat weighs down the veggies and keeps them from popping out.

5. The finale . . . toppings – I love to put salsa on top, but perhaps you might enjoy sour cream or something else!

6. Serve with salad or bed of rice or just by itself!

Taco Seasoning Ingredients

Servings: I would guestimate about 8-10 TBSP

(I have no idea where I originally got this recipe from, but it has been adapted.)

– 1/4 cup dried onions, minced (sometimes I use powdered)1/4 cup chili powder
– 1 TBSP salt
– 4 tsp cornstarch
– 1 TBSP dried garlic, minced (sometimes I use powdered)
– 1 TBSP cumin, ground
– 1 TBSP red pepper flakes, crushed
– 1+1/2 tsp dried oregano (either powdered or flakes)

Taco Seasoning Directions:

1. Mix all the seasonings together in an airtight container. (I like to use a glass jar with a tight fitting lid). It should keep 6 months – 1 year, but I always use mine up before then.

2. When ready to use, you need about 2-4 TBSP of seasoning (to taste) and 1/3-1/2 cup of water to 1 lb. of cooked meat. Spoon into the pan after you have begun to brown the meat.

Read Full Post »

Bestof-GF-Award-Logo-AWARDnom2013

So . . . my Gluten Freedoms Blog has been nominated for the Third-Annual Best of Gluten-Free Awards, which will recognize the best gluten-free brands and products on the market!!!  Yippee!

The only way I’ll win is to get enough votes, sooooo . . .

Please vote for me and have all your friends and family do the same.  You can vote from now through March 31, 2013.

How to Vote:

1. Click the link: www.bestofglutenfreeawards.com

2. Hit “take survey”

3. (You’re welcome to take the whole survey and win prizes, but if not . .), jump to services and resources at bottom

4. Scroll down to blogs, and vote for Gluten Freedoms

Thank you, thank you, thank you for all of your support!!

Love,
Annsley

Read Full Post »

20130228-134725.jpg

And, NO, I was thankfully not in the car.

Sorry for my delay in getting posts up, but I have been side tracked by a hit and run side swipe in the Whole Foods parking lot!!

I found my car with someone else’s paint all over the back driver’s side after finishing my shopping. And just to think that I was wondering how I was going to kill an hour before picking up my daughter and her friend 🙂 !

20130228-134732.jpg

First, I took pictures of the car and ground where paint lay everywhere. Then, I ran back into whole foods to see if I could look at their video camera, only to learn that because their parking lot is leased, only an insurance company can have access to it. Grrr!

Just as I was leaving I ran into a lovely police officer who advised me to file a police report.

So, I head around the corner to (luckily) the police precinct, only to learn:

1. You have to have your insurance card and registration on hand, (so I had to go back to the car to fetch it!)
2. My deductible might be higher than the estimate, in which case it doesn’t behoove me to file it, and therefore I will never have Whole Foods video footage.
3. The only way to find out what is best for me to do is to go get an estimate before filing.

But honestly, I just want to watch the videos and catch the jerk who didn’t even bother to leave a message, other than half the paint off his/her car.

I guess I must have needed some adventure today. Lol!! Alas. . .

Read Full Post »

20130228-091626.jpg

My Daughter Posing with her Gluten-Free Jewel Pop

This is a quick and easy gluten-free, dairy-free, soy-free, vegan snack.

Lemonade Popsicles

Ingredients:

– Fruit juice of any kind – we used lemonade aid, (but you can also reconstitute the frozen kind,too)

80-3879_Jewel Pop Molds-Main

Tovolo Jewel Pop Molds

Supplies:

– Popsicle molds or Dixie cups and Popsicle sticks
(We love our Tovolo Freezer Jewel Pop Molds, Set of 6, because they’re a perfect size and fit right on your finger!)

Directions:

1. Pour lemonade aid or fruit juice into molds*.
2. Put in freezer. The amount if time will depend on how large your Popsicles are.

*NOTE: If using Dixie cups and Popsicle sticks, you might want to place a piece of aluminum foil over the cup, make a small hole in the center for the stick, and put the stick through the hole. That way, the stick will not fall over.

Read Full Post »

Our Little Family

Our Little Family

Sorry I’ve been MIA for so long.  In a nut shell, here’s what’s happened since Thanksgiving.  I was in Atlanta visiting family, started to feel achy, but didn’t run a fever so I thought it was all in my head.  I took a tylenol and it seemed to remove the ache to enjoy the rest of my stay.

I get back to Philadelphia and 2 days later I head to the Berkshires with my mom.  I had developed this nasty, deep, rattling cough.  I noticed that my pulse was racing and was twice as high as the normal rate.  I tried to go on some hikes, but found myself so void of energy.  I decided to listen to my body and head back in by the fire.

me & mom in berkshires dec. 2012

My mom & Me in Berkshires

Meanwhile . . . you have to watch this movie trailer I made to understand some complications to these problems:

Click on Link or Picture Below:

preview

http://www.youtube.com/watch?v=GaJIdI-aesc

Several days later I make it back to Philly where I find myself unable to get off the couch . . .  I probably ended up with the flu, which I think I never believed was actually real.  I just thought when people said they had the flu, they had a fever and chills.  I NEVER manifested a fever, but found myself sobbing on the couch.  I couldn’t lift my head.  I spent the next 2 weeks laying there with no TV and no books and I wasn’t even bored.  It did present a minor childcare problem though . . .

So, during these 2 weeks I find that I probably don’t have the flu, but bronchitis or pneumonia.  However, due to complications you’ll note in the video, I was unable to get an x-ray.  I also had cracked a rib or pulled a muscle at this point from coughing up what I call “Green Goblins”.  I was in so much pain I found myself sobbing on the floor.  I finally went on a Z-Pak and tylenol with codine.  Can you imagine that I’d never been on a painkiller before, so I decided to only take half?  Within 2 days I was able to stand for about 10 minutes at a time.

I finish the Z-Pak in time to fly to Atlanta on Christmas Day.  I’m functioning for all of a day and a half before I hit the couch again for another week with the stomach virus that all of us got – my husband, daughter, and parents.  It was almost funny . . .

My stomach has been a mess ever since the antibiotics and the stomach virus.  No matter how many probiotics I can get down, there seem to be some added complications, (so make sure you watch the movie trailer)!

All of this was probably a much needed way of my body to telling me to slow down.  I’m working hard to listen and so that’s just what I’ve been doing.

Needless to say, at the end of all of this, I’m resurfacing and apologize for not keeping up with my blog.  I promise to try to do a better job!

Hope you’re staying well this winter season!

Read Full Post »

My Little Family

I had been planning this day for many, many months. As my husband, a non-athlete, took up running almost 2 years ago, I never thought he would stick with it, and as it turns out, he just completed the Philly Marathon less than a week ago. I am so incredibly proud of him and honored to know him, that I had to come up with a way to support his dedication and honor his perseverance . . . A surprise 35th (gluten-free) birthday party with a running theme!
If there’s anything to know about me, it’s that I LOVE surprises, and I LOVE themes. So, with my dad’s help, it all began.
The theme: a 3.5 mile run for my husband’s 35th birthday. His last name starting with a K, the race was titled:

The BEN K 3.5 mile Run

1. We sent out Evites

Invitation

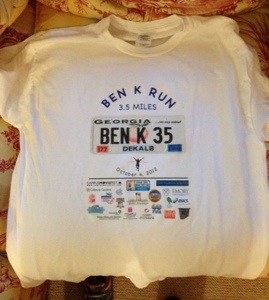
2. We began designing our race shirts. We first designed them with photoshop and then ironed on each one. I ordered iron-on transfers in bulk from amazon.com (18 for around $18) and the shirts from http://www.shirtsupplier.com (around $2/shirt). Since my husband is from Atlanta, I was able to create the old GA license tag with his birth county on the bottom,  the year he was born, and the year it is now on either side of the tag. All the “sponsors” were places that held importance in my husband’s life, whether it was the brand of shoe he wore (or had worn – my mistake!), his favorite breakfast place, or his alma matter.

20121108-200205.jpg

3. It was time to think about ordering the bibs from Athlete Race Number:

Of course Ben got the # 35 bib!

ben’s race number

(The bibs we got were a bit pricier, because my dad agreed to get those if we put him as a sponsor. We got 100 bibs for $45.52, but you can just order 100 plain numbers for $22.43)

4. We then drove around to map out the race course that started and ended at my parents’ house. We made maps of the course. We decided to have a 1.1 mile option as well for walkers and kids.

Benk 3.5 mile loop map

5. I ordered the 2 gluten-free cakes from Sally’s Gluten-Free Bakery in Atlanta, Ga. A 13″x9″ sheet cake came to $35. I also ordered a half-sized cake that came in the round. They iced the cake, but couldn’t decorate it. So, I called on my mother-in-law for her cake-decorating help! (By the way, the cakes are amazing!!! None of the guests knew the difference! And my MIL is amazing!!)

GF B-Day Cake from Sally’s GF Bakery

MIL Decorating Cake

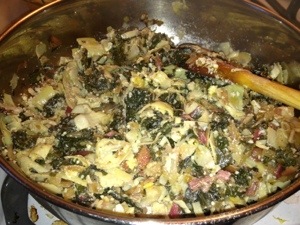
6. Ordering the Food – ALWAYS LOOK FOR COUPON CODES!! I learned the hard way, that there are cheaper ways to do things. I decided to have bagels, veggies & dip, fruit, and water. Since I didn’t have enough time to chop the veggies myself due to the fact I was flying in for this, I called Publix (the grocery) who makes wonderful GF platters. (However, if I’d know, you could pick up platters in the grocery store that weren’t part of the catering for half the price. They didn’t look as nice though.) We got both GF bagels and gluten bagels, because they were cheaper and there was no need for everyone to eat GF.

Publix Fruit Platter (M) feeding 16-20 people = $36.99
Publix Veggie Platter (M) feeding 16-20 people = $29.99
Udi’s GF Bagels – 4 bagels for at least $6
Einstein’s Bagels (with 20% whole order coupon) – 13 dozen with 2 containers of spread for $14.50 (pre-coupon)


7. Making the Medals – I made witty race medals for everyone, but the birthday boy. Ben got a 1st place medal from TrophyPartner.com.
The other medals I made using an exacto knife and cardboard. Then I printed up labels with the race date info, slapped them on the back, punched holes with a hole puncher, threaded ribbon from the dollar store through it, and wrote on the front, i.e., from my architect friend I wrote “Fastest Leed Runner”
labeled benk medal

8. The Dollar Store Run – table clothes, platters, cups, napkins, cutlery, bubbles, candles, chalk

9. Creating the Silly Liability Running Waivers for all the many lawyers in the bunch, and whoever signed “agreed” that if they did not cross the finish line, they would pay for our daughter’s education (among other things). That was my dad’s cute idea.

brother-in-law (lawyer) carefully reading the liability waiver with dad

10. Chalking the Race Course – We chalked the whole race the morning of so people wouldn’t get lost.

Dad Chalking Start

11. The Surprise – Priceless!!

Surprised Husband

So, you want to know how I pulled it off? 

I told him that I was going to let him sleep late, and I’d take care of our daughter.  He had no problems with that.  We got up extra early, did everything we needed.  I had the guests arrive in the front to wait in the patio area.  Once they had all assembled, I woke Ben up and had him put on some clothes.  I told him I had made him breakfast and we were going to eat it on the patio outside.  So, this is his face when he made it outside .  .  .

12. The Start of the Race

At the Starting Line

13. The Award Ceremony – At the end of the race, each guest received their special medal and their t-shirt.

14. Ben K Trivia – Food and dessert were complemented by funny trivia all about my husband. We had door prizes to give out with my dad’s logo on them for the winners. One of the questions asked how tall Ben was. We measured him, and the winner got the tape measure!

It was truly an amazing morning! I found this the most fun, because it gave people a reason to be social and get to know one another (and all with-in budget).

Happy Birthday to the most Beautiful Man that I know!

Read Full Post »

Traveling Trail Mix

If you’re about to travel for any of the upcoming holidays, this is an easy traveling snack to through together.

In any kind of container, mix a hand full of the following ingredients.  Feel free to tell me other foods you like in your trail mix!
– Nature’s Path GF Whole O’s
– Corn Chex
– Eden Organic or Ocean Spray Cranberries
– Raisins
– Happy Baby Green Puffs
– Enjoy Life Chocolate Chips
– Snyder’s GF pretzels
– Optional: Nuts of any kind

Dried Cranberries, OrganicNewman's Own Organics Raisins

Enjoy Life Semi-sweet Chocolate Mini Chips
Snyder's Of Hanover Gluten Free Pretzel Sticks

Read Full Post »

Diane Ravitch's blog

A site to discuss education and democracy

APS Today

The official blog of Atlanta Public Schools

Granted, and...

thoughts on education by Grant Wiggins

Celiac Central: Bits and Bites

National Foundation for Celiac Awareness staff members dish and digest

Maia Toll

Gluten-Free Food and Fun

WRiteLiveLily

A Catalog of Writing-in-Progress

Invision Events: Wedding Planner | Day Of Wedding Coordinator | Atlanta | Birmingham | Montgomery | Auburn | Dallas | Ft. Worth

Wedding Planner and Day Of Wedding Coordinator for Georgia and Alabama | Atlanta | Birmingham | Montgomery | Auburn | Mobile | Dallas | Ft. Worth

StressLess Views and other TidBits

Gluten-Free Food and Fun

Happy Go Lucky & Gluten Free

Gluten-Free Food and Fun

Gluten Freedoms' Blog

Gluten-Free Food and Fun